CCNA Routing and Switching
<< IP and Network Fundamentals Course
>> IPv4 Address System Section

Let’s dig into Understanding Classless Subnetting Concept. In my previous article Understanding Classless Subnet Mask, I have explained briefly why in the 90’s a new approach to distribute the IP Space Classless Subnet Masks was required to replace Classful Masks. In this article, I am going to dig deep into this approach for Subnetting (dividing) the Classful Networks into smaller Subnets.
Table of Contents
Subnetting Class A Networks
As mentioned, Classful A Networks use 255.0.0.0 Netmask, but it can uses Classful B Netmask 255.255.0.0, or Classful C default Netmask 255.255.255.0, however, it’s important to remember that default Classful Masking Rule is by Byte base, yet the Classless Subnetting Rule is by Bit base. Let me show you what I mean.
Abbreviation Symbols
- n = Network
- S = Subnet
- s = Sub-Subnet
- h = Hosts
Besides:
- When “Subnet Bit” words are used: I am referring to 1
- When “Host Bit” words are used: I am referring to 0
The following Subnet Masking technique based on moving the Network place value bit by bit at a time. You will notice how I started with the first subnet mask then little by little start moving bit at a time, up to the last possible Subnet Mask.
Analyzing 255.128.0.0 Subnet Mask
Subnet Mask:       255.128.0.0
Prefix:            /9 bits
Binary Equivalent: 11111111.10000000.00000000.00000000
Meaning:           nnnnnnnn.Shhhhhh.hhhhhhhh.hhhhhhhh
Increment Number:  128
Focusing on the 2nd byte 1000000, draw the Binary chart and plug the 2nd byte starting from the right.
128   64   32   16   8   4   2   1
  1    0    0    0   0   0   0   0
Once the first bit at the second byte turned ON, the byte get divided by 2, meaning, 256 / 2 = 128. Another way of saying: because the 1st bit on the 2nd byte represents the main origin of the Network, then you have created 2 Subnets.
The following draw shows how the 255.0.0.0 had all the hosts bits under One Network, and how later on the 255.128.0.0 divided the Hosts bits to 2 Subnets.
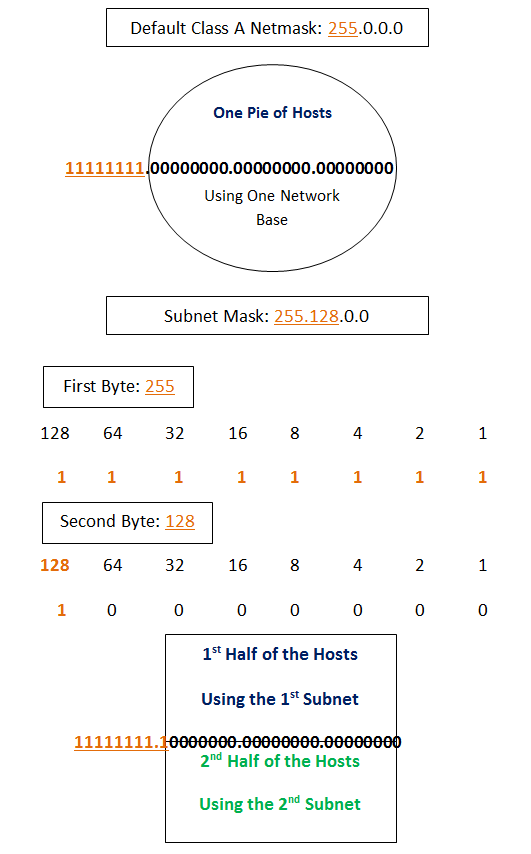
As you can see from the above image, the 1st bit on the second Byte from the left was turned ON which have divided the Classful Network to 2 subnets.
Laying out 255.128.0.0 or Prefix /9 Result
The following layout is for Private Network 10.0.0.0 with prefix/9. It shows how prefix /9 divided the Network to 2 Subnet IDs with 2 Broadcast Addresses.
Subnet ID Zero:    10.0.0.0
Broadcast Address: 10.127.255.255
Usable IP Range:   10.0.0.1 up to 10.127.255.254

Subnet ID 128:     10.128.0.0
Broadcast Address: 10.255.255.255
Usable IP Range:   10.128.0.1 up to 10.255.255.254
Remember, dividing the Network to Subnets, creates Multiple Networks (called Subnet IDs), and more than one Broadcast Address.
Using prefix /9 canceled the origin Network ID 10.0.0.0/8, and created 2 subnets:
- Subnet ID Zero: 10.0.0.0/9 with broadcast 10.127.255.255; and,
- Subnet ID 128: 10.128.0.0/9 with broadcast of 10.255.255.255.
And since Cisco Recommends No more than 510 IP Addresses per Subnet, prefix /9 is not practical to use neither in Public nor in private. It provides more than 510 usable IP addresses, and it would be impossible to be used by ISP for Public use, since it lease massive number of IP addresses which more than the Business needs or any Router needs.
You need smaller blocks of IP range such 510, 254, 128, 64 and 32, these blocks of IP range are mostly used by private Networks inside the company, ISP on the other hand, which is the Public side of our Internet, should release smaller Blocks such 16, 8, 4, and 2 for most businesses.
TIP: Network Address Translation (NAT) for home and business use, played big role in saving the IPv4 Space, it can share one Public IP Address among hundreds and thousands of computers. Besides, business can use Variable Length Subnet Masks (VLSM) as well before using the Public Block of IP Addresses if needed. VLSM simply means Sub-Subnetting.
Subnetting Network 10.0.0.0
The following IP address range of Subnet ID Zero when using 255.128.0.0 Subnet Mask a.k.a Prefix /9
First Subnet ID Zero: 10.0.0.0/9
First IP Address: 10.0.0.2
Subnet Mask:      255.128.0.0
Subnet ID:        10.0.0.0
Broadcast:        10.127.255.255
Gateway:          10.0.0.1
Last IP Address:  10.127.255.254
The following IP address range of Subnet ID 128 when using 255.128.0.0 Subnet Mask a.k.a Prefix /9
Second Subnet ID 128: 10.128.0.0/9
First IP Address: 10.128.0.2
Subnet Mask:      255.128.0.0
Subnet ID:        10.128.0.0
Broadcast:        10.255.255.255
Gateway:          10.128.0.1
Last IP Address:  10.255.255.254
I will continue Subnetting Network 10.0.0.0 but without laying out the usable IP Address range of each subnet due to space reason, however, the importance of the following examples is to show you what’s happening at the Binary level.
Subnetting 10.0.0.0 using Prefix /10 or 255.192.0.0
Using 255.192.0.0 prefix /10 will divide Network 10.0.0.0 for 4 Subnets.
Subnet Mask:       255.192.0.0
Prefix:            /10 Bits
Binary Equivalent: 11111111.11000000.00000000.00000000
Meaning:           nnnnnnnn.SShhhhhh.hhhhhhhh.hhhhhhhh
Increment Number:  64
As 32-bit Address prefix Base
1 2 3 4 5 6 7 8.9 10 11 12 13 14 15 16.17 18 19 20 21 22 23 24.25 26 27 28 29 30 31 32
1 1 1 1 1 1 1 1.1  1  0  0  0  0  0  0. 0  0  0  0  0  0  0  0. 0  0  0  0  0  0  0  0
Subnetting 10.0.0.0 using Prefix /11 or 255.224.0.0
Using 255.224.0.0 prefix /11 will divide Network 10.0.0.0 for 8 Subnets.
Subnet Mask:       255.224.0.0
Prefix:            /11 Bits
Binary Equivalent: 11111111.11100000.00000000.00000000
Meaning:           nnnnnnnn.SSShhhhh.hhhhhhhh.hhhhhhhh
Increment Number:  32
As 32-bit Address prefix Base
1 2 3 4 5 6 7 8.9 10 11 12 13 14 15 16.17 18 19 20 21 22 23 24.25 26 27 28 29 30 31 32
1 1 1 1 1 1 1 1.1  1  1  0  0  0  0  0. 0  0  0  0  0  0  0  0. 0  0  0  0  0  0  0  0
Subnetting 10.0.0.0 using Prefix /12 or 255.240.0.0
Using 255.240.0.0 prefix /12 will divide Network 10.0.0.0 for 16 Subnets.
Subnet Mask:       255.240.0.0
Prefix:            /12 Bits
Binary Equivalent: 11111111.11110000.00000000.00000000
Meaning:           nnnnnnnn.SSSShhhh.hhhhhhhh.hhhhhhhh
Increment Number:  16
As 32-bit Address prefix Base
1 2 3 4 5 6 7 8.9 10 11 12 13 14 15 16.17 18 19 20 21 22 23 24.25 26 27 28 29 30 31 32
1 1 1 1 1 1 1 1.1  1  1  1  0  0  0  0. 0  0  0  0  0  0  0  0. 0  0  0  0  0  0  0  0
Subnetting 10.0.0.0 using Prefix /13 or 255.248.0.0
Using 255.248.0.0 prefix /13 will divide Network 10.0.0.0 for 32 Subnets.
Subnet Mask:       255.248.0.0
Prefix:            /13 Bits
Binary Equivalent: 11111111.11111000.00000000.00000000
Meaning:           nnnnnnnn.SSSSShhh.hhhhhhhh.hhhhhhhh
Increment Number:  8
As 32-bit Address prefix Base
1 2 3 4 5 6 7 8.9 10 11 12 13 14 15 16.17 18 19 20 21 22 23 24.25 26 27 28 29 30 31 32
1 1 1 1 1 1 1 1.1  1  1  1  1  0  0  0. 0  0  0  0  0  0  0  0. 0  0  0  0  0  0  0  0
Subnetting 10.0.0.0 using Prefix /14 or 255.252.0.0
Using 255.252.0.0 prefix /14 will divide Network 10.0.0.0 for 64 Subnets.
Subnet Mask:       255.252.0.0
Prefix:            /14 Bits
Binary Equivalent: 11111111.11111100.00000000.00000000
Meaning:           nnnnnnnn.SSSSSShh.hhhhhhhh.hhhhhhhh
Increment Number:  4
As 32-bit Address prefix Base
1 2 3 4 5 6 7 8.9 10 11 12 13 14 15 16.17 18 19 20 21 22 23 24.25 26 27 28 29 30 31 32
1 1 1 1 1 1 1 1.1  1  1  1  1  1  0  0. 0  0  0  0  0  0  0  0. 0  0  0  0  0  0  0  0
Subnetting 10.0.0.0 using prefix /15 or 255.254.0.0
Using 255.254.0.0 prefix /15 will divide Network 10.0.0.0 for 128 Subnets.
Subnet Mask:       255.254.0.0
Prefix:            /15 Bits
Binary Equivalent: 11111111.11111110.00000000.00000000
Meaning:           nnnnnnnn.SSSSSSSh.hhhhhhhh.hhhhhhhh
Increment Number:  2
As 32-bit Address prefix Base
1 2 3 4 5 6 7 8.9 10 11 12 13 14 15 16. 17 18 19 20 21 22 23 24.25 26 27 28 29 30 31 32
1 1 1 1 1 1 1 1.1  1  1  1  1  1  1  0.  0  0  0  0  0  0  0  0.0   0  0  0  0  0  0  0
Subnetting 10.0.0.0 using prefix /16 or 255.255.0.0
Using 255.255.0.0 prefix /16 will divide Network 10.0.0.0 for 256 Subnets.
Subnet Mask:       255.255.0.0
Prefix:            /16 Bits
Binary Equivalent: 11111111.11111111.00000000.00000000
Meaning:           nnnnnnnn.SSSSSSSS.hhhhhhhh.hhhhhhhh
Increment Number:  1
As 32-bit Address prefix Base
1 2 3 4 5 6 7 8.9 10 11 12 13 14 15 16.17 18 19 20 21 22 23 24.25 26 27 28 29 30 31 32
1 1 1 1 1 1 1 1.1  1  1  1  1  1  1  0. 0  0  0  0  0  0  0  0. 0  0  0  0  0  0  0  0
And so on…then the Subnet Mask will continue on the third byte as follows: 255.255.128.0… 255.255.254.0, up to 255.255.255.0, and jumps on the 4th Byte as follows: 255.255.255.128… up to the last possible Subnet Mask 255.255.255.252.
252 at the last Byte a.k.a prefix /30, will give you 2 usable IP Addresses suitable for WAN connection between 2 Routers.
Analyzing the Subnet Masks
So, If you use Subnet Mask 255.192.0.0 (which is 128+64=192) then we divided the Network to 4 subnets instead of One big Classful Network, simply because there are 4 64s inside 256, notice how the 256 is a center or the origin.
Subnet Mask: 255.192.0.0
Binary:      11111111.11000000.00000000.00000000
Prefix:      /10 Bits
Meaning:     nnnnnnnn.SS000000.00000000.00000000
Increment#:  64
Note: Always the last Subnet bit determines the division of the Network, which is the Increment Number. Notice how the Subnet bit at place 64 tells us that 256 holds 4 64s places, hence, 4 Subnets!
You probably heard of Magic number or Interesting number, it simply says: where ever you choose to stop your Subnet Bit moves, then its place value become the Increment Number of all Subnets.
Let’s say you have one pie of Pizza, and you have decided to divide it using a Quart measurement such a 25% measurement, therefore, this measurement will divide the Pizza Pie for 4 Pieces!
25% is your measurement base, and if you used Subnet Mask 255.192.0.0 with any Classful A Network, then (25%) or 64 place will be your Subnet Base, which will give you 4 Subnets inside the 256 Pie!
You start from 128, 192, 224, 240, 248, 252, 254 …up to 255, then again, but this time at the 3rd Byte: 128, 192, 224, 240, 248, 252, 254, up to 255, then again on the 4th Byte: 128, 192, 224, 240, 248, and up to only 252 on the last Byte.
Notice, that you can’t go more than 252 on the last 4th Byte, simply because you have to have 4 Zeros places left. One for the Subnet ID, the second one for the Broadcast Address, and the last 2 Zeros in the middle as usable 2 IP Addresses.
So, with the last Byte using 32-bit IPv4 Networks, the last subnet Mask that can be used is: 255.255.255.252 or prefix /30.
Classless vs. Classful
A Classful private A Network 10.0.0.0 that uses a default Mask 255.0.0.0 got static number in terms of Network and IP Addresses, which is One Big Network, and Massive number of usable IP addresses.
However, using Subnet Mask instead such 255.254.0.0 with Network private 10.0.0.0, you have switched from Static to Dynamic mode by moving the Subnet Bit 7 extra places to the right, hence, divided the Static One Big Network to 128 Subnets (27 = 128). Each Subnet got its own IP addresses range.
Subnetting 10.0.0.0 using prefix /15 or 255.254.0.0
Subnet Mask: 255.254.0.0
Binary:      11111111.11111110.00000000.000000000
Prefix:      /15
Meaning:     nnnnnnnn.SSSSSSSh.hhhhhhhh.hhhhhhhh
Increment #: 2
Why 254?
128  64  32  16  8  4  2  1
  1   1   1   1  1  1  1  0
Adding the ON Places 128 + 64 + 32 + 16 + 8 + 4 + 2 + 0 = 254
Subnetting 10.0.0.0 using prefix /16 or 255.255.0.0
Subnet Mask: 255.255.0.0
Binary:      11111111.11111111.00000000.00000000
Prefix:      /16
Meaning:     nnnnnnnn.SSSSSSSS.hhhhhhhh.hhhhhhhh
Increment #: 1
28 = 256 Subnets, meaning, divided the Network 10.0.0.0 to 256 Subnets.
Moving the bit 9 places to the right, which hits the third Byte. Moving the Subnet bit 9 places to the right would give you the following Subnet Mask:
Subnetting 10.0.0.0 using prefix /17 or 255.255.128.0
Subnet Mask: 255.255.128.0
Binary:      11111111.11111111.10000000.0000000
Prefix:      /17
Meaning:     nnnnnnnn.SSSSSSSS.Shhhhhhh.hhhhhhhh
Increment #: 128
Subnets: 29 = 512
Next, let’s move the Subnet bit 15 places to the right
Subnetting 10.0.0.0 using prefix /23 or 255.255.254.0
Subnet Mask: 255.255.254.0
Binary:      11111111.11111111.11111110.00000000
Prefix:      /23
Meaning:     nnnnnnnn.SSSSSSSS.SSSSSSSh.hhhhhhhh
Increment #: 2
As mentioned, the Moment you start moving the Subnet bit to the right, it becomes Classless A Subnet. So, moving it 15 Places would give you 215 = 32,768 Subnets. Notice how the Host bits are less by now. To calculate the Hosts 29 = 512 – 2 = 510 usable IP Addresses.
And if you move the subnet bit 16 places, then you wand up with at 255.255.255.0 Subnet Mask which gives you 28 = 256 – 2 = 254 Usable IP Addresses and 216 = 65,536 Subnets. Each carries 254 IP Addresses.
So, a Classful A Network such 10.0.0.0 with prefix 8, carries millions of IP addresses. In order to reduce its Big IP Space from millions to 510 or 254 IP addresses per subnet, you need to decrease the Host bit places by moving the Network bit places as needed to right.
Subnetting Class B Networks
Private 172.16.0.0 Network using prefix /16 would be only one network which with only one IP Range, besides, there will be no Increment since no Subnetting has been defined.
Network:   172.16.0.0
           10101100.00010000.00000000.00000000

Broadcast: 172.16.255.255
           10101100.00010000.11111111.11111111

Netmask:   255.255.0.0
           11111111.11111111.00000000.00000000
           nnnnnnnn.nnnnnnnn.hhhhhhhh.hhhhhhhh
IP Range: 172.16.0.1 – 172.16.255.254
Now, let’s divide 172.16.0.0/16 Private Class B Network prefix /19 or Subnet Mask 255.255.224.0
TIP: At Class B, the Subnet bit starts at the 3rd byte. Besides, private B Networks can use prefix /17 up to prefix /30.
Subnetting 172.16.0.0 using prefix /19 or 255.255.224.0
Subnet Mask: 255.255.224.0
Binary:      11111111.11111111.11100000.00000000
Prefix:      /19
Meaning:     nnnnnnnn.nnnnnnnn.SSShhhhh.hhhhhhhh
Increment #: 32
Subnets: 23 = 8
Hosts: 213 – 2 = 8190
Notice the last Subnet bit which is the Increment number, it dictates Subnet Numbers, hence, IP Range in each Subnet. Our last bit on the third Byte is: 32, therefore, 172.16.0.0 is Subnet Zero, 172.16.32.0 is Subnet 32, 172.16.64.0 is Subnet 64, and so on, the increment is 32. 172.16.0.0/16 Network has been divided to 8 subnets each carries 8,190 usable IP addresses.
Let’s do Quick Math:
Subnets: 23 = 8 (from /16 to /19 are 3 Subnet Bit places)
Hosts: 213 – 2 = 8190 usable IP Address per Subnet (13 are the Host bits Places)
Using prefix /19, then you have left with 13 bits for the Hosts (32 – 19 = 13), therefore, 213 – 2 = 8190 Hosts per Subnet, but that’s not practical to have such number of hosts per subnet, however, it’s good to practice different prefixes.
As recommended by Cisco and has been proven by the real world as well, that the maximum number you should have on each Subnet is: 510 usable IP Addresses. If you can make it 254 would be better, the lowest the better to lower Broadcast messages effect.
Layout 172.16.0.0/19 Subnets and their IP Address Range
The first subnet would be subnet ID Zero 172.16.0.0, and since 32 is the increment number, the second subnet would be 172.16.32.0, and so on.
The 8 subnets of 172.16.0.0/19 with their Broadcasts, along with their IP Range, using prefix /19 as increment 32:
Subnet 0:    172.16.0.0
Broadcast:   172.16.31.255
Subnet Mask: 255.255.224.0
IP Range:    172.16.0.1 – 172.16.31.254

Subnet 32:   172.16.32.0
Broadcast:   172.16.63.255
Subnet Mask: 255.255.224.0
IP Range:    172.16.32.1 – 172.16.63.254

Subnet 64:   172.16.64.0
Broadcast:   172.16.95.255
Subnet Mask: 255.255.224.0
IP Range:    172.16.64.1 – 172.16.95.254

Subnet 96:   172.16.96.0
Broadcast:   172.16.127.255
Subnet Mask: 255.255.224.0
IP Range:    172.16.96.1 – 172.16.127.254

Subnet 128:  172.16.128.0
Broadcast:   172.16.159.255
Subnet Mask: 255.255.224.0
IP Range:    172.16.128.1 – 172.16.159.254

Subnet 160:  172.16.160.0
Broadcast:   172.16.191.255
Subnet Mask: 255.255.224.0
IP Range:    172.16.160.1 – 172.16.191.254

Subnet 192:  172.16.192.0
Broadcast:   172.16.223.255
Subnet Mask: 255.255.224.0
IP Range:    172.16.192.1 – 172.16.223.254

Up to…

Subnet 224:  172.16.224.0
Broadcast:   172.16.255.255
Subnet Mask: 255.255.224.0
IP Range:    172.16.224.1 – 172.16.255.254
Subnetting 172.16.0.0 using prefix /23 or 255.255.254.0
Subnet Mask: 255.255.254.0
Binary:      11111111.11111111.11111110.00000000
Meaning:     nnnnnnnn.nnnnnnnn.SSSSSSSh.hhhhhhhh
Increment #: 2
Once again, notice how the last Subnet bit located at the third byte (which its place value is falls under 2) always dictates Subnet Numbers and IP Range in each Subnet.
Our last bit’s value on the third Byte is: 2, therefore, 256 / 2 = 128 Subnets. The Network has been divided to 128 subnets each carries 510 usable IP addresses.
Do the math:
Subnets: 27 = 128
Hosts: 29 – 2 = 510 usable IP Address per Subnet
Subnetting 172.16.0.0 using prefix /24 or 255.255.255.0
More practical prefix for all Classful Private Networks would be prefix /24.
Subnet Mask: 255.255.255.0
Binary:      11111111.11111111.11111111.00000000
Meaning:     nnnnnnnn.nnnnnnnn.SSSSSSSS.hhhhhhhh
Our last bit on the third Byte is: 1, therefore, 256 / 1 = 256 Subnets. The Network has been divided to 256 subnets each carries 254 usable IP addresses.
Do the math:
Subnets: 28 = 256
Hosts: 28 – 2 = 254 usable IP Address per Subnet
Subnetting can be on the Public or the Private side
On the Public side, ISP provider leases you a Subnetted Block of IP addresses if you have business account, you might have the choice to Sub-subnet that block for smaller Subnetworks in order to utilize the block in an efficient way. Sub-Subnetting public IP Address space gives you the opportunity to assign public IP Address for more than one Network device, that is Variable Length Subnet Mask which I will talk about at the next articles as small letter s = Sub-Subnet!
On the private side, Subnetting Private Networks will easy the management of your company Network needs. A company that might have 50 branches around the world, must have 50 subnets in their Domain Controller, therefore, Subnetting your Internal Private IP space is a must to control the Network of all your company branches.
Conclusion
Class A Networks give you the most amount of Subnets when you use Classless Subnets, and since it’s origin Mask start with far on the Left as 255.0.0.0, you have 3 Bytes free for Subnetting, Class B Networks got 2 Bytes for Subnetting, and finally Class C got Only one Byte for Subnetting.
Subject Related
By Wikipedia Subnetwork | Router Ally IPv4 | HighTech IPv4 Addressing | The TCP IP Guide | Cisco CCNA Simplified | Cisco CCNA in 60 Days | CCNA R&S Certification Kit | Subnetting Made Easy | Who is Running the Internet | IP Addressing and Subnetting | The Only IP Book You Will Ever Need!
CCNA Routing and Switching
<< IP and Network Fundamentals Course
>> IPv4 Address System Section

LEAVE A COMMENT