Building Professional Web Hosting Solution
<< Linux Basic Setup and Configuration Course
>> Linux VM/VPS Fundamental Configuration Section
- Configuring Local or Public DNS PTR Records
- Debian Based Hostname Plus Network Configuration
- Red Hat Based Hostname Plus Network Configuration
- Red Hat Based Systems Network Manager Text UI

After Creating my VPS or VM, the first thing I would start with is to Configuring Local or Public DNS PTR Records. Since the rest of courses are focused on VPS, I will focus more on the Public DNS settings records, which might take some time to propagate. So, I always start by DNS settings first before system configuration. I will cover Local and Public DNS settings, especially VPS DNS settings needs which to create and set DNS PTR records, DNS A and AAAA records, and finally test and verify DNS records.
Objectives:
1. Local Domain vs. Public Domain
2. Public Domain and Sub-domain
3. Reverse DNS PTR Records
4. Configuring DNS PTR Records
5. Testing and Verifying DNS Records
Prerequisites:
A. Basic Domain, Sub-domain, or DNS Knowledge
B. Login to your DigitalOcean or Vultr Account
C. Post Linux OS Setup Initial Steps Section
Note: Setting and Configuring basic requirements such PTR and A records, Static IP Address, Hostname (FQDN), and Hosts File before configuring any service is a must step.
Table of Contents
Local Domain vs. Public Domain
When you lease a Public VPS, one if its requirements is to have a Public Domain Name (E.g. yourname.com). But what if you are working on private environment such VirtualBox? Well, there is a local Domain Name as well you can use such yourname.local. So, you can create private local domain along with its sub-domain to be used at your Admin or development station.
Assuming you need to prepare a VM as Development Web Hosting Server, initially, you need to create a local domain and a sub-domain which called A records. If you are a Windows user, you can create local domains and sub-domains using the Windows hosts file located under windows >> system32 >> drivers >> etc folder.
TIP: Remember that the hosts file considered the first config file where a Server or PC utilize to translate a Hostname or FQDN into IP Address before asking the local or public DNS server. Meaning, I can point ccnahub.com to 192.168.1.26 which is my Local Web Hosting Server.
Same thing goes with MAC and Linux Stations, the hosts file located at /etc/hosts. Once you add A records Entries inside your Main Station’s hosts file, you will be able to browse that VM IP address using a URL such node.yourwebserver.local or www.yourname.local from your Main Station’s Browser.
Note: When you work locally using your Main Station’s Hosts file, you can pick and choose any root domains, it’s your Machine :). The root domain can be .local, .com, .net, .me, .org, and so on. Since these settings are taking place at your local station using the hosts file, hence, is not known to the internet. Therefore, it’s great method for testing and development environments.
By the way, too many developers use local domains and sub-domains to develop websites using the hosts file, and once they are done, they push the updates to a Stage and then Production Server. For example, I have a development Web Server running as VirtualBox VM called node.wordpresshostinghub.local where I use it specifically to develop wordpress websites and among them is ccnahub.com website.
Once I am done developing and testing, I take Full backup of my wordpress website then restore it on my Production WordPress Website. However, this’s not the best way to keep your website updated with your developing site, but it’s a way that works fine for my needs right now.
If you have an active website which accept user registration or planing to, then overwriting your website with full backup is not a good idea, rather, you need a Sync solution between your local Development Server, your Staging Server, and your Production Server to Sync and test only the changes, usually called Staging to Production Solution. Let’s look at my Windows Hosts file:
My Win7’s hosts file A records Entries look like this:
192.168.1.26 node.wordpresshostinghub.local node
192.168.1.26 ccnahub.com www.ccnahub.com
So, what are those entries? Well, I’m forcing my Laptop Windows7 Station’s web browser to point my website at the Development Web Server’s IP Address (which it’s a VirtualBox VM) when I browse www.ccnahub.com or node.wordpresshostinghub.local
And once I am done, and would like to browse the real website from the Public VPS, just append the A record entry using the hash tag # sign to disable it. Hash sign will disable A record entry used by hosts file, so the web browser in this case will ask the public DNS server instead to browse the Production website.
TIP: I recommend to use different web browser for LIVE website browsing, for example, I use Firefox for developing my wordpress, then I use chrome to view the changes. Besides, I keep IE or Safari only for the Production Live website. This way, I don’t need to keep emptying my browser cache files when I disable the A records entries. Or, if you have enough RAM and horse power at your laptop, create a Virtual Management Machine only for Development and use your Main Station to browse Production Website.
Hash Tag Sign disabled the A record entry
#192.168.1.26 ccnahub.com www.ccnahub.com
Remember, that you are going to use a sub-domain such node.yourwebserver.local as FQDN for the linked clone VM which will act as Development Web Server, so take your time and pick the right IP Address and right FQDN name. Once you edit your Main Station hosts file, replace 192.168.1.26 as shown below using your own Web Server VM Private IP Address and adjust the sub-domain and yourdomain.com names as needed.
Remember that you can use any local domain locally such node.yourwebserver.local for development purpose, but when it comes to a public VPS, you need to register your own official domain name and create a sub-domain pointing them to the Public VPS IP Address. Mine for example are: node.ccnahub.com which used for the Web server hostname or FQDN, and ccnahub.com domain which is used for the website.
Local A Records Entries using Hosts File
192.168.1.26 node.yourwebserver.local node
192.168.1.26 yourname.com www.yourname.com
node.yourwebserver.local > Sub-domain is FQDN
node > is the hostname
TIP: The Internet uses FQDN and never deals with hostnames among its servers around the world. Level 3 or 4 domains are mostly used among the servers. Hostnames are required only for internal communication inside the server, and can be used only at home or office Networks. However, when it comes to IPv4 communications (even though it’s private network) FQDN such node.yourwebserver.local should be used. You probably asking: Why we still need a hostname such “node” besides the FQDN?
Well, we still need to mention the hostname “node” beside the FQDN for VM’s or VPS internal communications, but when someone from outside of the machine ask the VM or VPS for a service, FQDN should be used to respond. Websites on the other hand, use level 2 domain names such ccnahub.com, and most of the time appended by the World Wide Web (www). Finally level 1 or root domains are .com, .net, .org, and so on.
VPS Hostname Requirement
Public VPS requires hostname as sub-domain during creation. VPS node name can be such node1.yourdomain.com, node2.yourdomain.com, and so on. DigitalOcean or Vultr will ask you to choose a hostname (sub-domain) while you are creating a VPS instance, once the VPS up and running, its Public IP Addresses v4 and v6 will be used to create the sub-domain later on at your DNS control panel. This public sub-domain will be used as Host Management link at your VPS, such https://node.yourdomain.com:8080.
Public Domain and Sub-domain
Public VPS requires Public Domain name especially a sub-domain as FQDN such node1.ccnahub.com. After creating your VPS with the required hostname, grab your VPS IP v4 and v6 addresses, login to your domain DNS Control Panel at your domain registrar panel, or if you use DNS manager like cloudflare to create A record for IPv4, and AAAA record for IPv6.
A public sub-domain such node1.ccnahub.com can be used for few things such management purpose https://node1.ccnahub.com:8080 and Mail services. Below, I will show you how Reverse DNS/PTR records are set using either DigitalOcean or Vultr.
Reverse DNS PTR Records
It’s a DNS record that map your server’s IP address to your VPS hostname. There are 2 steps or locations to accomplish successful Reverse DNS/PTR records:
1. At your VPS provider Control Panel: Create PTR records Mapping VPS’s IP Address to it’s hostname or FQDN.
2. At your Domain Registrar Control Panel: Create Sub-domains or FQDN with A and AAAA records, pointed to your VPS IP addresses.
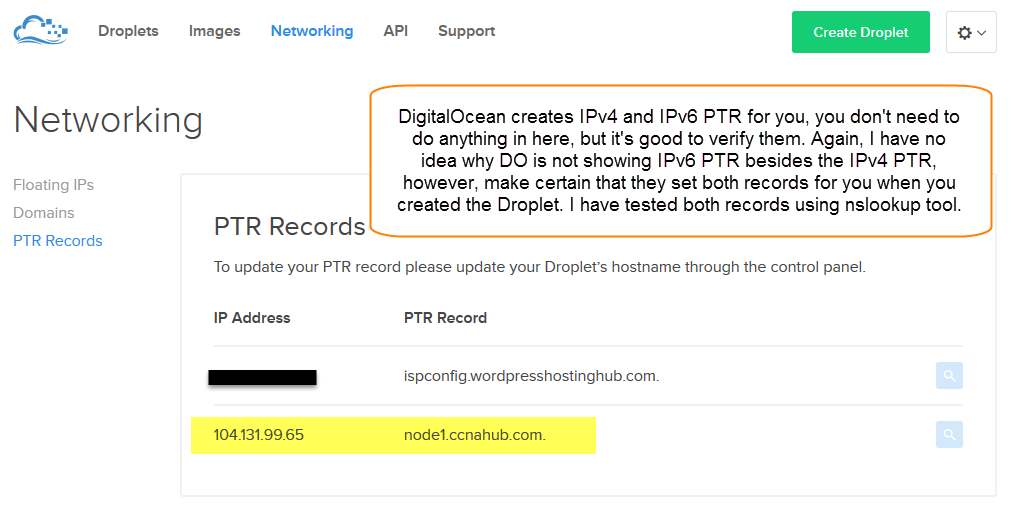
For instance, using DigitalOcean, they already set IPv4 and IPv6 PTR Records for you when you create the Droplets. However, you still need to get the Droplet’s Public IP addresses 4 and 6, then login to your domain DNS manager to create a sub-domain, then assign this sub-domain your VPS’s IPv4 and 6 addresses.
TIP: Creating an A or AAAA record will create a sub-domain as well. The moment you add a A or AAAA record, the DNS manager will create the sub-domain with the IP address assigned.
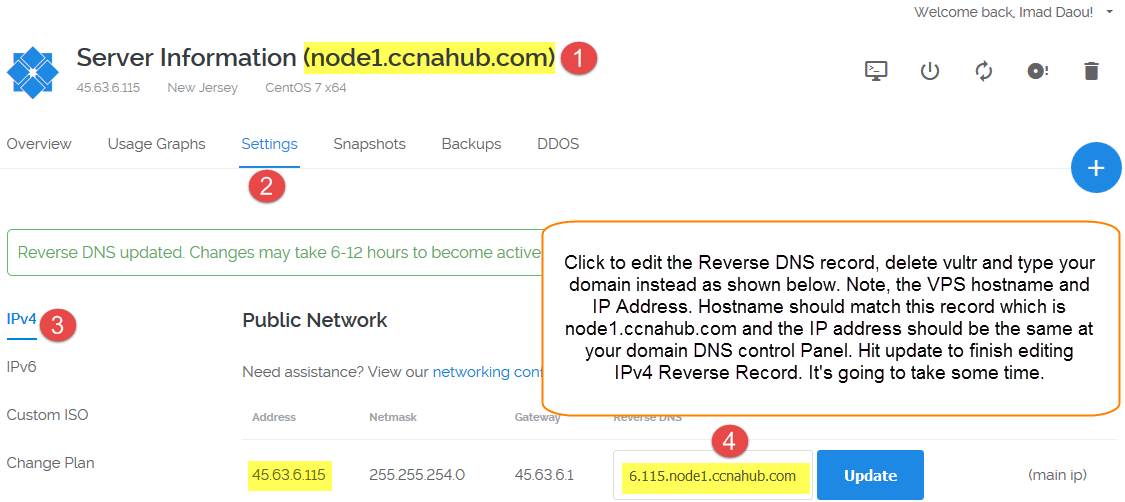
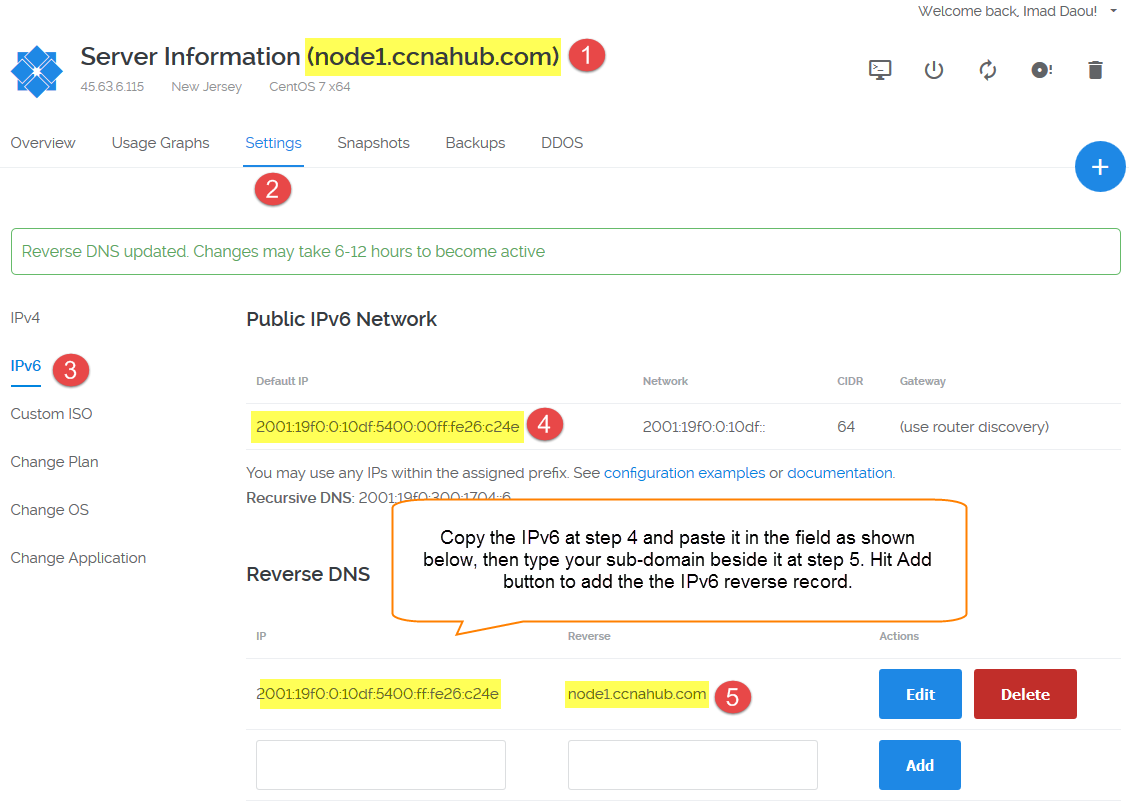
Note: Whether you use DigitalOcean, Vultr, or any VPS Public provider, the concept is the same. You need to prepare Your VPS’s Public IPv4 and IPv6 addresses before heading to your Domain Registrar or DNS Control Panel Management. To clear some confusion, under DigitalOcean it’s referred to as PTR record and under Vultr referred to as Reverse DNS Record.
Configuring DNS PTR Records
Prepare your Domain Registrar DNS Control Panel credentials, or if you have already pointed your domain to different Name Servers DNS Manager such Cloudflare, then you need cloudflare credentials. I don’t recommend pointing your domain name servers to a VPS provider name servers unless you need to, rather, use DNS and CDN management such Cloudflare for DNS management to point only specific required records such A and AAAA records to your VPS.
I have pointed all my domain nameservers to Cloudflare nameservers, hence, I manage my Domain’s DNS records using Cloudflare control panel. However, I won’t show you in this article how to open Cloudflare account, but I will show you how to prepare your VPS reverse DNS/PTR records, and how to map them using A or AAAA records using Cloudflare. If you are not using Cloudflare as your domain DNS manager, then every domain registrar should allow you to create A and AAAA DNS records.
Note: Besides, as of this writing, DigitalOcean doesn’t list IPv6 PTR the way Vultr show you IPv4 and v6 PTR records. I have confirmed with their support that it’s already created and set properly when you create the Droplet.
Using DigitalOcean – Assigning node1.ccnahub.com IPv4 PTR Record
 Using Vultr – Assigning node1.ccnahub.com IPv4 Reverse Record
Using Vultr – Assigning node1.ccnahub.com IPv6 Reverse Record
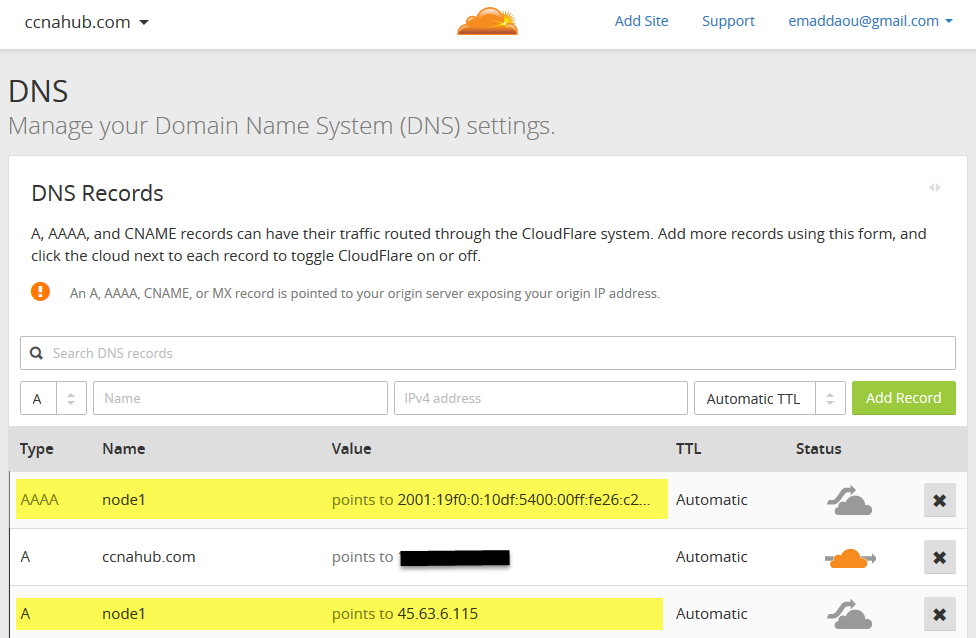
Using Cloudflare – Assigning node1.ccnahub.com IPv4 A Record and IPv6 AAAA Record
As you can see below, the IP Addresses match the Vultr IP Settings of my node1.ccnahub.com instance.
Testing and Verifying DNS Records
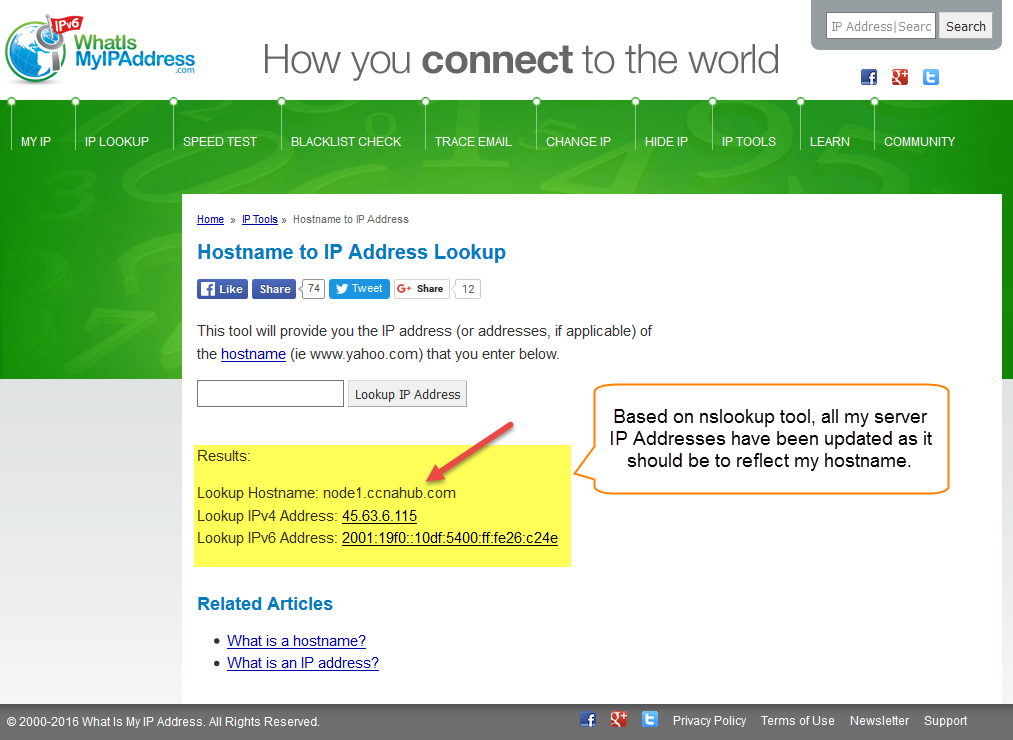
You will probably need to wait few minutes or hours before verifying. I usually use http://whatismyipaddress.com/hostname-ip as nslookup tool. Open this tool, type your sub-domain in the box, and hit Lookup IP Address. If everything went fine, you should be able to see your VPS’s IPv4 and IPv6 assigned to that sub-domain.
The following image shows that node1.ccnahub.com was created successfully, and the A and AAAA records pointing to the right IP addresses.
Subject Related
By Wikipedia DNS | IT World | DNS Stuff | PC Names | How Domains Work
Building Professional Web Hosting Solution
<< Linux Basic Setup and Configuration Course
>> Linux VM/VPS Fundamental Configuration Section
- Configuring Local or Public DNS PTR Records
- Debian Based Hostname Plus Network Configuration
- Red Hat Based Hostname Plus Network Configuration
- Red Hat Based Systems Network Manager Text UI

LEAVE A COMMENT