Building Professional Web Hosting Solution
<< Linux Basic Setup and Configuration Course
>> Configuring SSH-Key Based Authentication Section
- Understanding SSH-Keys Based Authentication
- Creating SSH-Keys using Putty Keys Generator
- Creating Public VPS Droplet using DigitalOcean
- Managing Linux VPS Instance via Putty SSH Client
- Managing Linux VPS Instance via WinSCP Client
- Creating SSH-Keys using Terminal Keys Generator
- Switching SSH Password to SSH-Keys Authentication
- Uploading Admins and Friends SSH-Keys to VPS
- Uploading SSH Public Keys using VPS Panel
- SSH Hopping using SSH Agent Forwarding
- Deploying Public VPS instance using Vultr Provider
- Securing and Hardening SSH Server Configuration
- SSH Server and Client Most Known Error Messages

Creating SSH-Keys using Putty Keys Generator is highly recommended before deploying your VPS instance, hence, SSH-Keys Authentication will be used instead of Password Authentication. SSH-Keys are part of the OpenSSH package which provides secure and encrypted communication between SSH Client (Admin Station) and the OpenSSH Server (VPS). SSH-Keys make it possible to have Multifactor Authentication mechanism between your Admin Station and your VPS.
Objectives:
Creating SSH-Keys using Puttygen
Prerequisites:
A. Basic Debian or Red Hat Linux Knowledge
B. Login to your DigitalOcean or Vultr Account
Recommendations:
For better performance, use VPS with at least 2 CPUs, 4G Memory, 1G Bandwidth, and SSD Storage drive.
Creating SSH-Keys using Putty-gen
If you haven’t yet, download and install Putty, pick the windows exe executable file “putty-0.62-installer.exe”. Once you install putty on windows, hit Start Button > All Programs > Putty > and fire up Putty-gen to generate SSH-Keys.
Run the following steps ( 1 to 4)
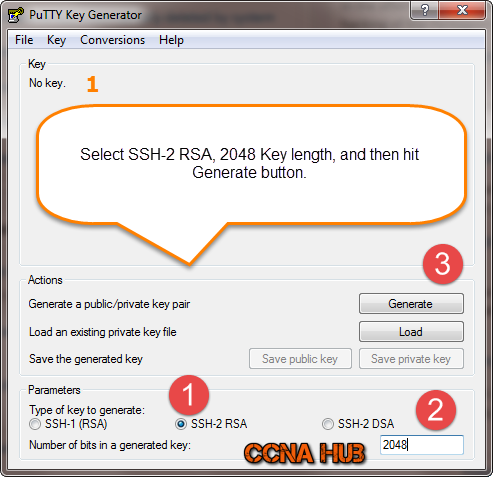
1. Fire Up Putty-gen
It’s important to choose SSH-2 RSA, 2048 Key length, and hit generate button.
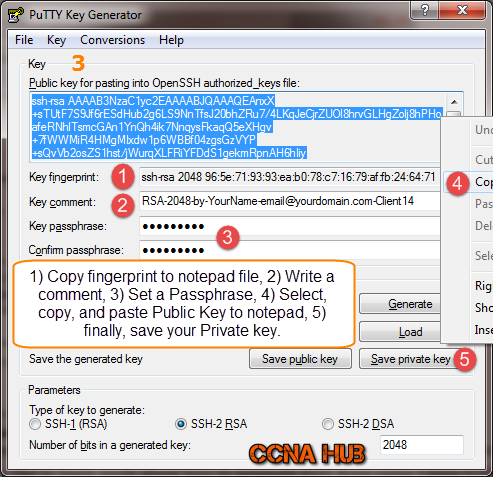
2. Generating SSH-Keys
Moving the mouse from right to left will generate randomness to generate the SSH-Keys.
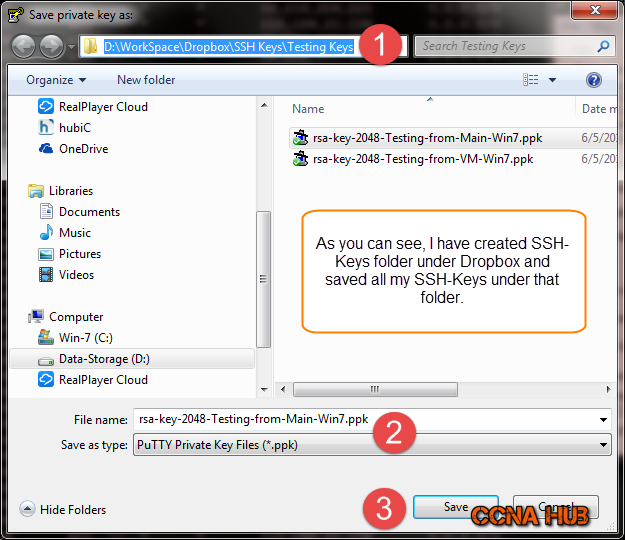
3. Saving Public Key and Private Key
Note: Save Public Key using .pub extension and Private Key using .ppk extension. Save both keys under the same folder for ease management. Besides, there is a button to save the Public Key, however, it’s format won’t be compatible with OpenSSH server, I usually select all, copy, and paste my public key on a notepad then save it using .pub extension.
Note: a, b, c, d, and e below represent the numbers on the image.
a. Under “Key Fingerprint“, copy fingerprint identification field and save it as RSA-2048-Client14-fingerprint.txt using notepad file.
b. Under “Key Comment“, I recommend to be more specific and add an informative comment to indicate what, who, and why this SSH-keys Pair was created.
TIP: For the future, if you had to do some support for some clients and their SysAdmin asked you to submit your Public SSH-Key (in order to grant you access to their VPS), then some people suggest to be more specific under comment field. For instance, you can type “RSA-2048-by-YourName-email@yourdomain.com-Client14” In this case, you will make it much easier for other SysAdmins to spot your public key.
c. “Passphrase” protects your Private Key in case someone access it without your permission.
TIP: Passphrase can be easy to remember and very strong to break, pick Few Words and Numbers as sentence to remember it. E.g. “I was born in Europe 1985, but I was raised in NY, USA since 90’s.” your Passphrase would be as follows Iwbie1biwrinus9 – it starts with capital ” I “. It would take a desktop PC approximately 8,707,845,285 years and 28 days to Brute Force and Crack this Passphrase! Notice, that I picked the first alphabet and the first digit to build the passphrase, besides, you can write these sentences safely on your personal notebook.
d. “Public Key” The selected area as shown indicates that I used right click, select all, and copied the public key to a Notepad or Text file. I will save it using .pub extension. I recommend you name your SSH-keys based on your comment. For instance, RSA-2048-Client14.pub
e. “Private Key” Saving private key is straight forward, just hit Save Private Key button and call it based on your comment using .ppk extension. For Instance, RSA-2048-Client14.ppk
4. Create SSH Folder Under Cloud Storage (Dropbox)
Note: Feel free to save your SSH-keys pair where ever you believe should be secure, dropbox is just a suggestion. Otherwise, save it under your document folder and back it up on encrypted USB stick.
Under that folder, save all your SSH-Keys (Private and Public), as mentioned above, be more specific in naming convention since you might create multiple SSH-Keys in the future. That’s it! You should be ready for next articles, however, if you are a Linux/UNIX user or like to learn more about how to generate SSH-Keys using Linux/UNIX Command Line, then keep reading.
Subject Related
By Wikipedia SSH | About SSH | Debian HowTo SSH-Keys | CentOS HowTo SSH-Keys | IBM SSH Key management Part1 and Part2
Building Professional Web Hosting Solution
<< Linux Basic Setup and Configuration Course
>> Configuring SSH-Key Based Authentication Section
- Understanding SSH-Keys Based Authentication
- Creating SSH-Keys using Putty Keys Generator
- Creating Public VPS Droplet using DigitalOcean
- Managing Linux VPS Instance via Putty SSH Client
- Managing Linux VPS Instance via WinSCP Client
- Creating SSH-Keys using Terminal Keys Generator
- Switching SSH Password to SSH-Keys Authentication
- Uploading Admins and Friends SSH-Keys to VPS
- Uploading SSH Public Keys using VPS Panel
- SSH Hopping using SSH Agent Forwarding
- Deploying Public VPS instance using Vultr Provider
- Securing and Hardening SSH Server Configuration
- SSH Server and Client Most Known Error Messages


LEAVE A COMMENT