Building Professional Web Hosting Solution
<< Linux Basic Setup and Configuration Course
>> Configuring SSH-Key Based Authentication Section
- Understanding SSH-Keys Based Authentication
- Creating SSH-Keys using Putty Keys Generator
- Creating Public VPS Droplet using DigitalOcean
- Managing Linux VPS Instance via Putty SSH Client
- Managing Linux VPS Instance via WinSCP Client
- Creating SSH-Keys using Terminal Keys Generator
- Switching SSH Password to SSH-Keys Authentication
- Uploading Admins and Friends SSH-Keys to VPS
- Uploading SSH Public Keys using VPS Panel
- SSH Hopping using SSH Agent Forwarding
- Deploying Public VPS instance using Vultr Provider
- Securing and Hardening SSH Server Configuration
- SSH Server and Client Most Known Error Messages

By default, OpenSSH Server works out of the box, however, Securing and Hardening SSH Server Configuration using known security practices is highly recommended. Custom security configuration can start by Restricting Access to Specific SSH Groups or Users, Disabling SSH Password Authentication, Disabling root Account SSH Login, Disabling X11Forwarding, and much more.
Objectives:
1. Restricting SSH Access to Specific Users
2. Restricting SSH Access to Specific Groups
3. Disabling SSH Password Authentication
4. Disabling Root Account SSH Login
5. Disabling SSH TCP Port Forwarding
6. Disabling Linux Desktop X11Forwading
7. Configuring Idle Logout Timeout Interval
8. Checking Configuration and Restarting SSH Server
Prerequisites:
A. Basic Debian or Red Hat Linux Knowledge
B. Login to your DigitalOcean or Vultr Account
Note: if you are using Admin account that is part of sudoers, use sudo before each command. For more information, check Understanding Root Account Privileges Methods.
Recommendations:
For better performance, use VPS with at least 2 CPUs, 4G Memory, 1G Bandwidth, and SSD Storage drive.
Table of Contents
Restricting SSH Access to Specific Users
Edit SSH Server Config File
nano /etc/ssh/sshd_config
Add AllowUsers to the end of sshd_config file as shown:
AllowUsers imad linuxadmin user1 user2
Now Save: Ctrl-X, Hit Y Key, and Enter.
Restricting SSH Access to Specific Groups
Run the following steps ( 1 to 3)
1. Edit SSH Server Config File
nano /etc/ssh/sshd_config
Add AllowGroups to the end of sshd_config file as shown:
AllowGroups ssh-admins
Now Save: Ctrl-X, Hit Y Key, and Enter.
2. Create ssh-admins Group
groupadd -r ssh-admins
3. Add Intended Users to ssh-admins Group
usermod -a -G ssh-admins imad
usermod -a -G ssh-admins linuxadmin
Disabling SSH Password Authentication
It is highly recommended to disable Password Authentication for SSH and use SSH-Keys Authentication instead. However, this step requires some preparation first.
a. Once disabled, all SSH users must be ready to use SSH-Keys Authentication instead, since they won’t be able to SSH using Password Authentication anymore.
b. If you have already created users on the intended VPS, then have your users create SSH-Keys on their Admin Stations, transfer their Public Keys to the intended VPS, and test the SSH-Keys connection before disabling SSH Password Authentication.
Note: For SysAdmins and Owners: The Password Authentication will be disabled Only and Only for SSH connections, you still can login as root or any user using Password Authentication through the Web Console.
Edit SSH Server Config File
nano /etc/ssh/sshd_config
Ctrl-w to search for PasswordAuthentication, change it’s value from yes to no, if it’s commented, uncomment as shown. Besides, Add ChallengeResponseAuthentication with no value.
[...]
ChallengeResponseAuthentication no
PasswordAuthentication no
[...]
Save: Ctrl-X, Hit Y Key, and Enter.
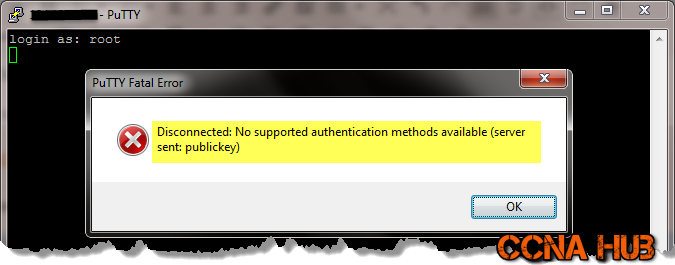
Now, all accounts including root account must use SSH-keys Authentication to SSH to the System instead of Password Authentication. If you try to login using Password Authentication, you will be prompted by the following message:
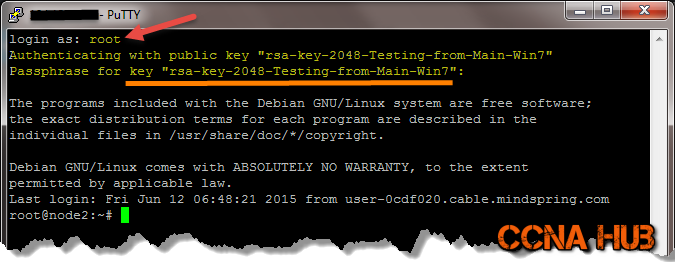
 However, if you use SSH-Keys as shown below, you will be able to Login.
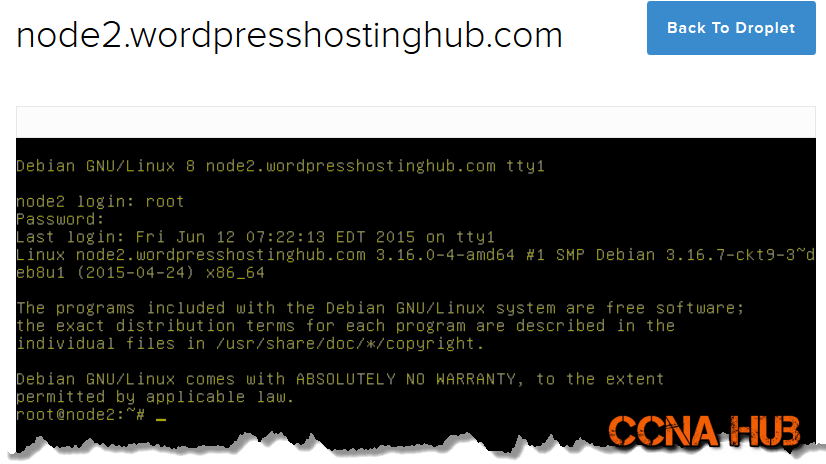
Although you disabled SSH Password Authentication, you should be able to login from the Web Console (Terminal) using Password Authentication as shown using DigitalOcean or Vultr web console.
Disabling Root Account SSH Login
I recommend you leave this step till you finish all Web Hosting Solution configuration articles. I suggest not to disable root ssh login if you use SSH Keys authentication based. Besides, if you still want to disable SSH root login, make sure you have prepared an Admin account by adding it to sudo members list.
Edit SSH Server Config File
nano /etc/ssh/sshd_config
Change yes to no disable root ssh login.
# Authentication:
[...]
PermitRootLogin yes
[...]
Disabling SSH TCP Port Forwarding
Insecure services such Telnet, HTTP, SMTP, IMAP, and other insecure protocols running over TCP can be forwarded using a secure tunnel by forwarding their connections through SSH TCP Port Forwarding. TCP Port forwarding is sometimes called “SSH Tunneling” simply because you are creating SSH secure “tunnel” through which another TCP/IP protocols can use to pass by.
Meaning, let’s say you later on installed WordPress CMS on your Web Hosting Solution without SSL certificate, (which is not recommended) logging in through HTTP allow Robots to sniff your user name and password while authenticating.
HTTPS in the other hand using SSL certificates will encrypt your credentials while you are logging in. However, life is not perfect, you may have to deal with a WordPress setup that has no SSL certificate, in this case SSH TCP Port Forwarding allows you to build a secure Tunnel between your Station and the VPS, which will allow you to manage and login to WordPress through Secure Encrypted Tunnel.
Note: It’s tricky though, you will still using http protocol and not https, however, with SSH TCP Forwarding, your connection would be something like: http://www.mywordpress.com:6000, 6000 port at your station port represent the secure tunnel socket between your station and port 80 at your VPS.
Since you may don’t need SSH TCP Port Forwarding right now, disable it.
Edit SSH Server Config File
nano /etc/ssh/sshd_config
Press Ctrl-w and search for AllowTcpForwarding, (if you can’t find it, add it to the end of the file) and change it’s value from yes to no as shown below:
[...]
# Disable TCP Port Forwarding
AllowTcpForwarding no
[...]
Save: Ctrl-X, Hit Y Key, and Enter.
Disabling Linux Desktop X11Forwading
As you you probably know, on Windows, the X11 called Windows Explorer, on MAC called Finder, and on Linux called X11 Windows. To spice X11 up on Linux, we use GNOME, Cinnamon, etc…X11 Forwarding can confuse beginners at first, let’s say you are running Citrix App Server at your company network, your users would be able to run MS Office for example through the Network without installing MS office at the local Machines. X11 Forwarding allow the users to run a specific App which located on the VPS through the Internet, pulling the Application from the Server and Popping it up at your Desktop.
However, you have to use SSH tunneling to encrypt and secure the X11 communication through what is called X11 Forwarding. I believe it’s cool feature if it’s needed. You will be able to use the application as if it’s installed on your Station. But, since this feature is not needed right now, disable it.
Edit SSH Server Config File
nano /etc/ssh/sshd_config
Ctrl-w again and search X11Forwarding and change it’s value from yes to no as shown below:
[...]
X11Forwarding no
[...]
Save: Ctrl-X, Hit Y Key, and Enter.
Configuring Idle Logout Timeout Interval
Edit SSH Server Config File
nano /etc/ssh/sshd_config
If you can’t find the below values, add them to the end of the file.
Note: 900 secs = 15 minutes. After this interval has passed, the idle user will be automatically logged out.
Add the following to the end of sshd_config file if it’s not there.
#Idle Logout Timeout Interval
ClientAliveInterval 900
ClientAliveCountMax 0
Save: Ctrl-X, Hit Y Key, and Enter.
Checking Configuration and Restarting SSH Server
Check your SSH configuration before restarting:
/usr/sbin/sshd -t
If there’s an error somewhere, it will be displayed on the screen as shown in the example below:
root@node:~# /usr/sbin/sshd -t
/etc/ssh/sshd_config: line 28: Bad configuration option: 8StrictModes
/etc/ssh/sshd_config: terminating, 1 bad configuration options
At line 28, I have typed number 8 by mistake before StrictModes.
Debug OpenSSH if needed
/usr/sbin/sshd -t -ddddd
Hit Ctrl-c to terminate debugging or exit to terminate the session and debugging.
Debian
service ssh restart
CentOS
service sshd restart
Verify that you can Open New SSH Session
To be in the safe side, and before you close your current SSH session, fire up another SSH session using Putty or a Terminal, and verify that you can login as root or login as Admin account that is part of Sudo members before you exit your current root SSH session.
You should be able to login as root if you haven’t disabled root login, however, you won’t be able to login as an Admin account since password Authentication is disabled, unless this user already created SSH-Keys and uploaded the public key to the server. You as root, can upload any Admin account’s Public Key to the VPS to grant him/her SSH access.
Subject Related
By | Wikipedia OpenSSH | CentOS OpenSSH | NixCraft | Wiki Mozilla | HowToForge
Building Professional Web Hosting Solution
<< Linux Basic Setup and Configuration Course
>> Configuring SSH-Key Based Authentication Section
- Understanding SSH-Keys Based Authentication
- Creating SSH-Keys using Putty Keys Generator
- Creating Public VPS Droplet using DigitalOcean
- Managing Linux VPS Instance via Putty SSH Client
- Managing Linux VPS Instance via WinSCP Client
- Creating SSH-Keys using Terminal Keys Generator
- Switching SSH Password to SSH-Keys Authentication
- Uploading Admins and Friends SSH-Keys to VPS
- Uploading SSH Public Keys using VPS Panel
- SSH Hopping using SSH Agent Forwarding
- Deploying Public VPS instance using Vultr Provider
- Securing and Hardening SSH Server Configuration
- SSH Server and Client Most Known Error Messages


LEAVE A COMMENT