Building Professional Web Hosting Solution
<< Linux Basic Setup and Configuration Course
>> Configuring SSH-Key Based Authentication Section
- Understanding SSH-Keys Based Authentication
- Creating SSH-Keys using Putty Keys Generator
- Creating Public VPS Droplet using DigitalOcean
- Managing Linux VPS Instance via Putty SSH Client
- Managing Linux VPS Instance via WinSCP Client
- Creating SSH-Keys using Terminal Keys Generator
- Switching SSH Password to SSH-Keys Authentication
- Uploading Admins and Friends SSH-Keys to VPS
- Uploading SSH Public Keys using VPS Panel
- SSH Hopping using SSH Agent Forwarding
- Deploying Public VPS instance using Vultr Provider
- Securing and Hardening SSH Server Configuration
- SSH Server and Client Most Known Error Messages

Managing Linux VPS Instance via Putty SSH Client is the most known SSH client by Linux community. Putty is my favorite ssh client to manage my VPS, as if I am settings in front of my server. As you probably know, Secure Shell (SSH) is an encrypted version of Telnet Terminal. Meaning, the communication from end to end is encrypted, although the communication is encrypted, you still need SSH-Keys, hence, I will talk about Putty Agent and ssh-agent for saving SSH-keys Passphrase.
Objectives:
1. Verifying VPS’s Key Fingerprint
2. Connecting to DigitalOcean or Vultr
3. Avoid Entering SSH-Keys Passphrase
4. Distributing VPS’s Key Fingerprint
Prerequisites:
A. Basic Debian or Red Hat Linux Knowledge
B. Login to your DigitalOcean or Vultr Account
Recommendations:
For better performance, use VPS with at least 2 CPUs, 4G Memory, 1G Bandwidth, and SSD Storage drive.
Keep In Mind
1. This Article can be applied using Virtual Infrastructures such VirtualBox, VMware Station, Proxmox, or public VPS provider such DigitalOcean or Vultr.
2. Creating your VPS using SSH-Keys or configuring current running VPS using SSH-keys is highly recommended, since it will eliminate the need to log in using root password, meaning, if you have built your VPS using SSH keys base authentication, you can safely disable “SSH Password Authentication” because you are using SSH-Keys pair to login instead of Password.
3. Notice, that I didn’t say to disable “Web Console Password Authentication”, rather only disable “SSH Password Authentication”. Web Console password authentication is needed in case one day you need to login from the web console and you can’t access the VPS using ssh, setting a New root password from the Web Console after creating an instance or Droplet is a must step.
4. You don’t need to worry about SSH-keys base authentication if you are testing on private environment such VirtualBox, VMware Station or Proxmox, however, you still can configure your VM or Container to use SSH-Keys using Switching SSH Password to SSH-Keys Authentication article. Regardless, I highly recommend to follow my Articles/Labs in order so you won’t miss a part.
Table of Contents
Verifying VPS’s Key Fingerprint
When you connect for the first time using any SSH Client, you will be prompted by Security Alert to verify VPS’s Host Key Fingerprint. Verification VPS’s Key fingerprint is very important security step to follow before you enter your credentials. Technically, the verification process is required by your ssh client, meaning, your Putty client or ssh-client is trying to protect your credentials.
let’s say an intruder was able to poison the VPS provider’s DNS server, hence, he will be able to switch the traffic to his site, if you don’t verify the Public Key fingerprints, you are accepting to enter your credentials on a compromised site that is controlled by the cracker, therefore, he will be able to sniff your credentials.
Bottom line, it is very important to retrieve your server’s key Fingerprint of your VPS from the web console and record it down, (you don’t need to record all fingerprint’s digits, just first and last 2 digits). So, when you connect and get prompted to verify the Host’s Key Fingerprint, you would be ready with the recorded Fingerprint digits on hand to match it, if it matches, then continue to enter your credentials.
Run the following steps ( 1 to 4)
1. View Current IP Configuration
You need to know what IP Address is being used by your VM or VPS. If you already know the IP Address or had set a static IP Address during OS setup, then move on to step 2. Note: If you are using a Public VPS, you should be able to retrieve the IP address from control panel. Otherwise, if you are using VirtualBox or VMware Station, at your Linux Terminal (which would be VirtualBox or VMware Station Window) login and run the following command to retrieve the IP Address:
ifconfig
Or
ip addr
2. Setting New Droplet Root Password
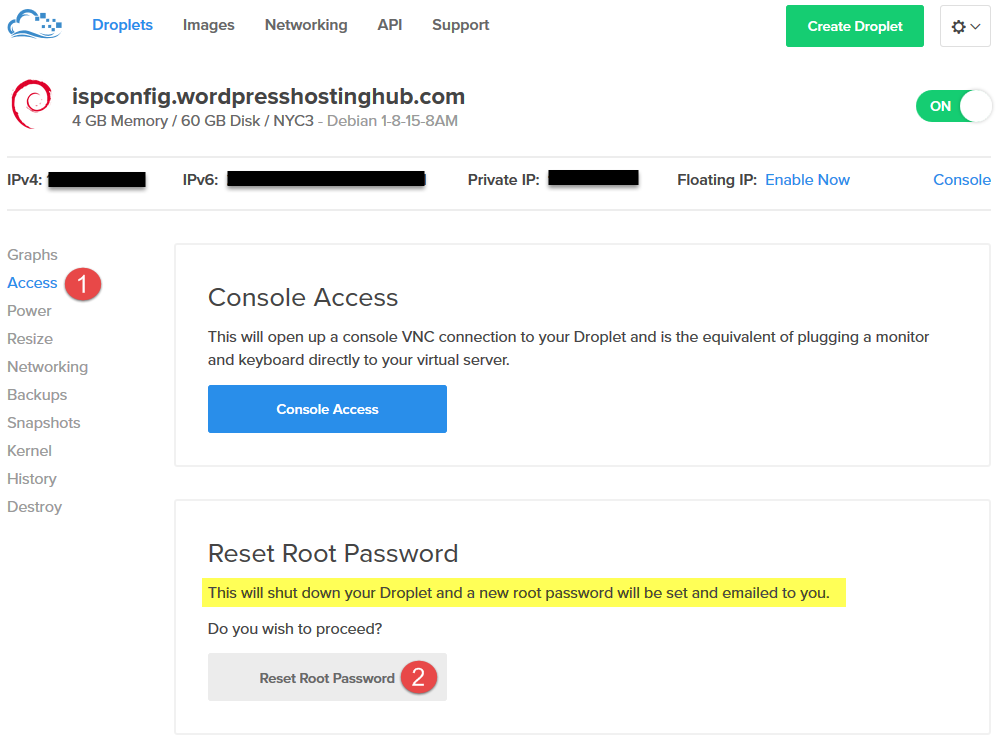
If you have created your VPS using SSH-keys, DigitalOcean DON’T send you or create root password, therefore, you can’t login to the web console in order to verify the VPS’s fingerprint. However, you can set a root password by resetting your droplet root password from the control panel, it will create a root password which can be used to login to the web console. Only if you have created your Droplet using SSH-keys, otherwise, skip this step.
Note: you might be asking, “Won’t resetting root password defeat the SSH-keys purpose?“, not at all, remember that you will disable “SSH Password Authentication” another word disabling password via SSH sessions using Secure and Harden SSH Server Configuration Lab, hence, SSH Password Authentication will be disabled through putty and allowed only through the Terminal (Web Console) in case one day you can’t access the VPS using Putty and SSH-keys. Besides, Web Console access required for later on Labs.
Login to DigitalOcean Control Panel and follow the steps as shown below to reset your root password. DigitalOcean Control Panel in continually enhancing and developing their interface, however, the numbered options below hopefully will be called the same, the aim is to set a root password by resetting the root password.
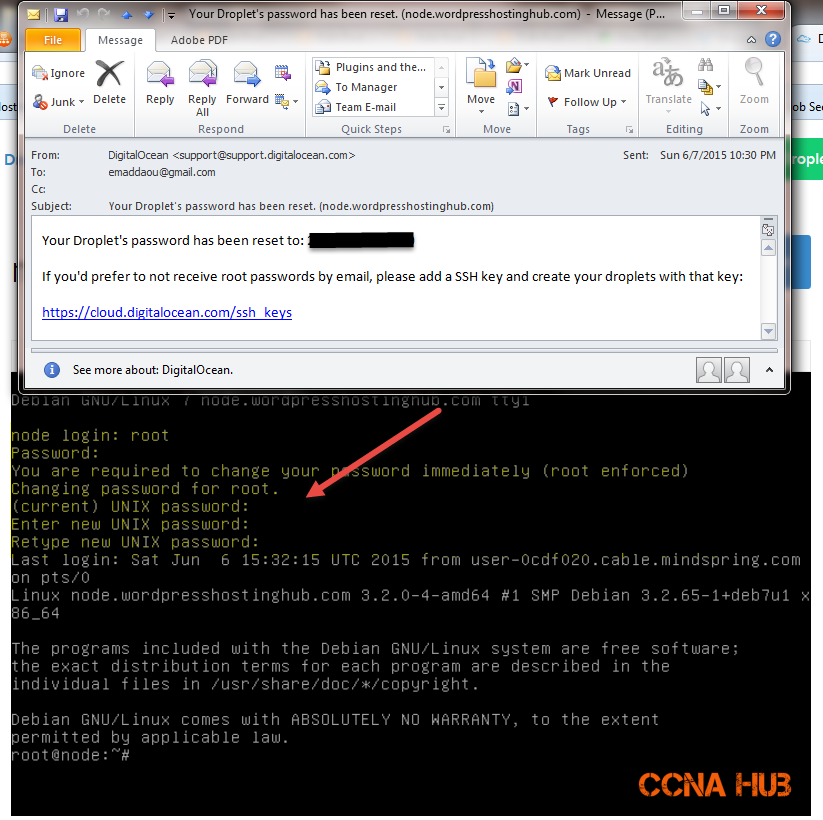
In few minutes, you will receive a temp root password.
- Go to your droplet again > Access > Console Access > and click on console.
- Open your email window and the console on top of each other, so it will be easy to type or paste the password on the console.
- The moment you enter the temp password, you will be asked to enter current password (which is the temp password, just reenter it again)
- Choose to enter New password. Again, remember to create a Passphrase instead of regular password.
3. View VPS Key Fingerprint using Web Console
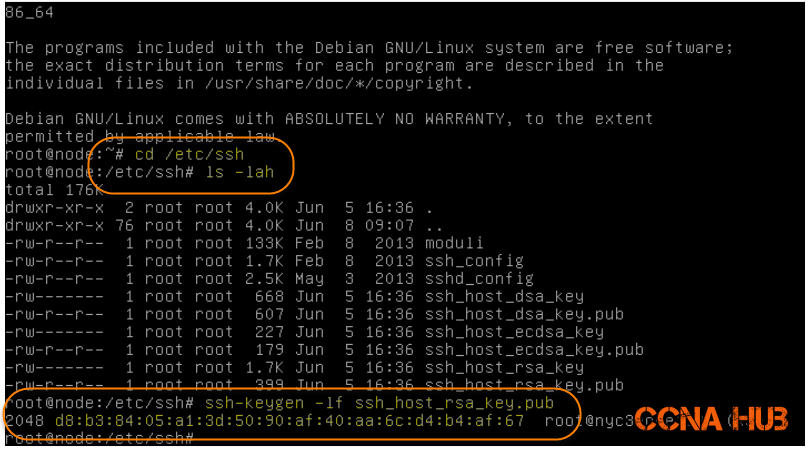
a. Navigate to SSH Folder
cd /etc/ssh
b. List the SSH Folder
ls -lah
c. View the Key Fingerprint
ssh-keygen -lf ssh_host_rsa_key.pub
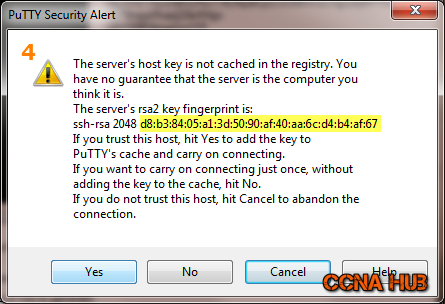
As shown in the image below, navigate as shown to verify the server’s key before you click Yes in Putty’s Security Alert message. In my case, the first and last 2 digits are d8 and 67. If you scroll down to Putty’s Security Alert Window, the digits below match with my putty’s security alert, therefore, I can safely Click Yes to enter my credentials.
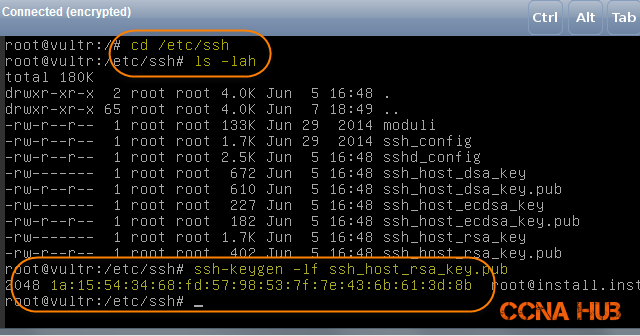
Would be the same as DigitalOcean, in fact, Vultr sets an Initial root password either creating the VPS using SSH-Keys or not, it will allow you to login to their web console right away to verify server’s key fingerprint without resting root password (as required by DigitalOcean).
Under Overview tab you will find the root password, once you login to your Vultr Web Console, view the Server’s Key Fingerprint ash shown below. In my case, as you can see from the image, I need the first 2 digits 1a and and last 2 digits 8b.
4. Run Putty SSH Client
If you haven’t yet, download and install Putty, pick the windows exe executable file “putty-0.62-installer.exe”. To create SSH-Keys, check Creating SSH-Keys using Putty SSH Client.
5. Verifying VPS Key Fingerprint
The moment you connect, you will be prompted by Putty to confirm your server’s key identifier as shown below. Since you were prepared for this step, verify and hit Yes to continue.
6. Settings New Root Password
TIP: Passphrase can be easy to remember and very strong to break, pick Few Words and Numbers as sentence to remember it. E.g. “I was born in Europe 1985, but I was raised in NY, USA since 90’s.” your Passphrase would be as follows Iwbie1biwrinus9 – it starts with capital ” I “. It would take a desktop PC approximately 8,707,845,285 years and 28 days to Brute Force and Crack this Passphrase!
passwd root
root@node1:~# passwd root
Enter new UNIX password: >> Enter Your New Root Password
Retype new UNIX password: >> Re-enter Your New Root Password
passwd: password updated successfully
By now, you should be able to connect using Putty or similar client and login to your VPS using SSH-Keys backed up with Passphrase, but to make life easy, you can save the passphrase of SSH-keys in the Memory before connecting to your VPS.
Connecting to DigitalOcean or Vultr
Below, I am going to show you how to connect using Putty and SSH-Keys.
Run the following steps ( 1 to 5)
1. Fire Up Putty
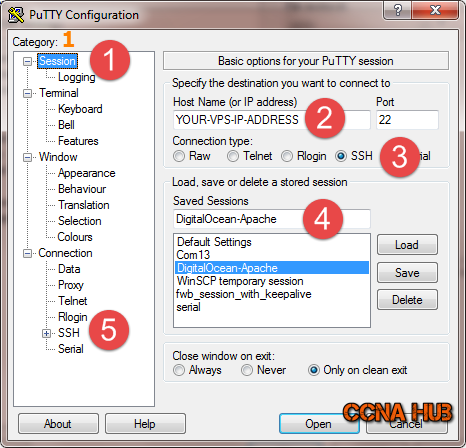
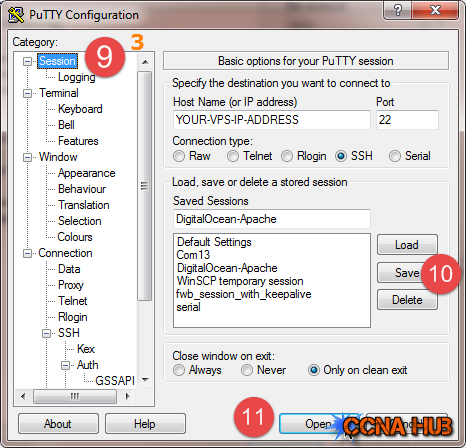
If you have created your VPS/Droplet using SSH-keys, you need to configure Putty as shown below to successfully login using SSH-keys. 1) Select Session Category, 2) Insert Your VPS IP Address, 3) Select SSH radio button, 4) Provide a Session Name, 5) click the Plus sign on SSH category to continue configuration…
2. Configure Putty SSH-Keys Authentication
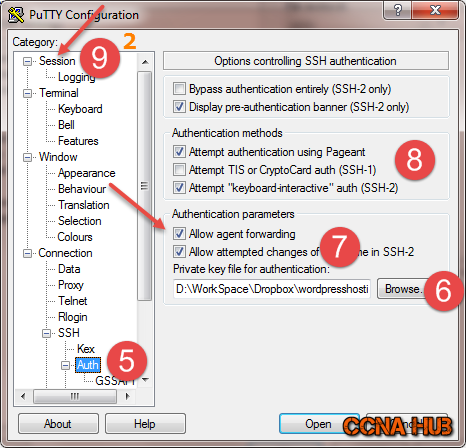
Under SSH category > Auth: 6) Browse Private Key path, 7) select the 2 options under Authentication Parameters, 8) select 2 options under Authentication Methods, 9) and go back to Session to continue configuration…
3. Save Profile/Site
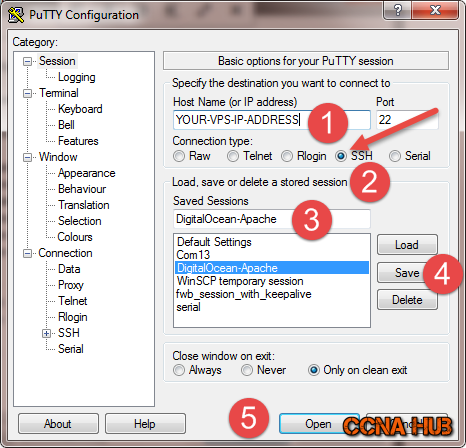
Next, 10) Press Save button to save your Profile, and finally 11) press Open button to connect.
4. Verify VPS’s Key Fingerprint
As mentioned, always verify VPS’s Key fingerprint before clicking Yes.
5. Enter Your Credentials
You will be prompted to enter your credential – user name and SSH-Keys passphrase.

Avoid Entering SSH-Keys Passphrase
If you have created your VPS using SSH-Keys pair, you would need to enter the Passphrase of your Private key every time you connect, however, you can use Putty Agent (PageAnt) to avoid entering Passphrase every time you connect.
If you are comfortable to have PageAnt save your Private Key Passphrase inside the Memory to Avoid Entering Passphrase Every Time You Connect, then follow the steps of the 2 images below, it will save you some time, especially if you deal with Multiple VPS instances.
Security Note: Saving Private Passphrase in Memory requires Secure Protected Admin Windows Station with latest Updates, Antivirus, and Anti-Spyware.
Adding Private Keys to PageAnt
Pageant is a simple Executable exe program, you will find it under Programs > Putty or download it from http://the.earth.li/~sgtatham/putty/latest/x86/pageant.exe it will run on your Task Bar. Add your Private Key to Pageant before firing up Putty, WinSCP, or Bitvise in order to avoid entering Passphrase every time you connect.
 All added Private Keys will be listed under PageAnt Key List as shown below.
To shutdown PageAnt, right click and hit on Exit. Remember that you will loose the credentials of all Added Private Keys; you will need to add them again with their Passphrases in order to use them. You can always remove specific keys and keep the one you are using instead of Exiting PageAnt all together.
Distributing VPS’s Key Fingerprints
As Owner or SysAdmin, you should plan before distributing the server’s key fingerprint to all intended users that suppose to login to your system in the future.
If you are planing to create users in your system, you would distribute them RSA server’s fingerprint using a secure way such encrypted emails or list them under your company encrypted website, so the users can retrieve all VPS’s fingerprints before entering their credentials.
I usually text the first and last 2 digits to other users, texting the fingerprint is not secure, but including only the first and last 2 digits in the text message, makes it hard for others to understand the message.
Why users should verify server’s key fingerprint before logging in? Well, if someone in the middle tapped the line and was able to route the traffic to his server, then all it takes one attempt and their credentials will be saved by the intruder.
Users should know, that the moment they press Yes to Putty’s Security Alert at their first login attempt, Putty will cache and track if the server changes its fingerprint in the future, and because every server in this world got its unique fingerprint identification, putty or any ssh client will warn users if a server’s fingerprint changes.
Run the following steps ( 1 to 2)
1. Move to /etc/ssh Directory
cd /etc/ssh
2. Key Fingerprint Retrieval Command
for file in *sa_key.pub; do ssh-keygen -lf $file; done
As you can see, with single command, you can view all Server Keys, and mostly used is RSA fingerprint. Share first 2 digits and last 2 with the intended user if needed later on.
1024 cc:bb:e6:44:20:df:74:66:06:91:68:b9:d1:c1:80:d9  root@nyc3node1394 (DSA)
256 3a:15:03:e7:0d:8a:c8:ad:f5:f9:b2:54:97:eb:58:5e  root@nyc3node1394 (ECDSA)
2048 d8:b3:84:05:a1:3d:50:90:af:40:aa:6c:d4:b4:af:67  root@nyc3node1394 (RSA)
Bottom line, never under any circumstances, under estimate intruders skills and their capabilities, therefore, always take the time and read all putty’s popped up messages or Terminal SSH client messages before clicking Yes or Ok. Write it down the message and ask your VPS provider for help if you don’t understand it.
Subject Related
By Wikipedia Putty | Wikipedia SSH-Agent | Download Putty | Putty User Manual | Putty Docs
Building Professional Web Hosting Solution
<< Linux Basic Setup and Configuration Course
>> Configuring SSH-Key Based Authentication Section
- Understanding SSH-Keys Based Authentication
- Creating SSH-Keys using Putty Keys Generator
- Creating Public VPS Droplet using DigitalOcean
- Managing Linux VPS Instance via Putty SSH Client
- Managing Linux VPS Instance via WinSCP Client
- Creating SSH-Keys using Terminal Keys Generator
- Switching SSH Password to SSH-Keys Authentication
- Uploading Admins and Friends SSH-Keys to VPS
- Uploading SSH Public Keys using VPS Panel
- SSH Hopping using SSH Agent Forwarding
- Deploying Public VPS instance using Vultr Provider
- Securing and Hardening SSH Server Configuration
- SSH Server and Client Most Known Error Messages


LEAVE A COMMENT