Building Professional Web Hosting Solution
<< Linux Basic Setup and Configuration Course
>> Configuring SSH-Key Based Authentication Section
- Understanding SSH-Keys Based Authentication
- Creating SSH-Keys using Putty Keys Generator
- Creating Public VPS Droplet using DigitalOcean
- Managing Linux VPS Instance via Putty SSH Client
- Managing Linux VPS Instance via WinSCP Client
- Creating SSH-Keys using Terminal Keys Generator
- Switching SSH Password to SSH-Keys Authentication
- Uploading Admins and Friends SSH-Keys to VPS
- Uploading SSH Public Keys using VPS Panel
- SSH Hopping using SSH Agent Forwarding
- Deploying Public VPS instance using Vultr Provider
- Securing and Hardening SSH Server Configuration
- SSH Server and Client Most Known Error Messages

Managing Linux VPS Instance via WinSCP Client is very handy for Windows users. I will show you how to configure WinSCP, and take a quick look at Bitvise and Linux/UNIX ssh clients. At the end, I will rap it up with Security Best Practices before using SSH clients. So, why do you need different types of SSH clients? Most of the time it’s personal preference, and mainly it depends on the type of management station you are using, such Windows, MAC, or Linux.
Objectives:
1. Connecting using WinSCP and SSH-Keys
2. Connecting using Bitvise and SSH-Keys
3. Connecting using Linux/UNIX SSH Client
4. SSH Clients and SSH-keys Security Best Practices
Prerequisites:
A. Basic Debian or Red Hat Linux Knowledge
B. Login to your DigitalOcean or Vultr Account
Recommendations:
For better performance, use VPS with at least 2 CPUs, 4G Memory, 1G Bandwidth, and SSD Storage drive.
Table of Contents
Connecting using WinSCP and SSH-Keys
WinSCP is one of my favorite tool to manage Linux from windows station. WinSCP can use PageAnt as well if running to prevent entering Passphrase every time you connect. If you haven’t yet, downloaded and installed Putty and WinSCP, please do and come back. To create SSH-Keys, check Creating SSH-Keys using Putty SSH Client.
Run the following steps ( 1 to 5)
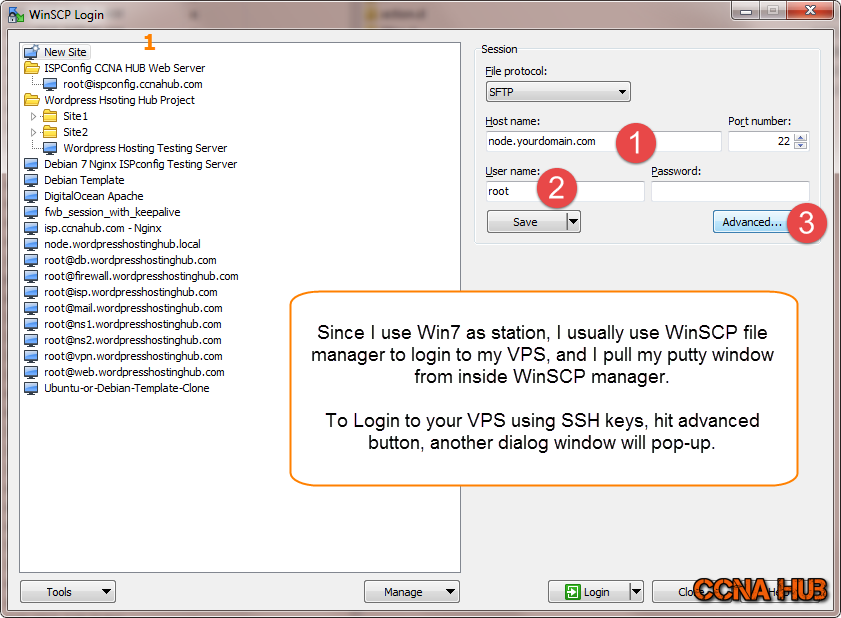
1. Fire Up WinSCP
Under host name field, you can use a Node name as sub-domain, but if you haven’t pointed your sub-domain to your VPS’s IP address yet, then you can use the VPS IP Address, type root, and press on Advanced button.
2. Configure WinSCP Authentication
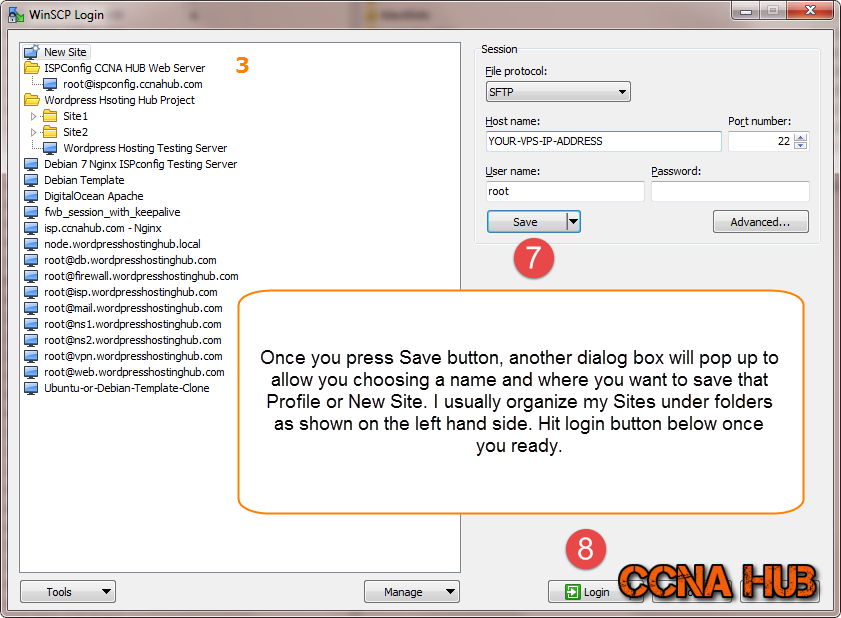
3. Save Profile/Site
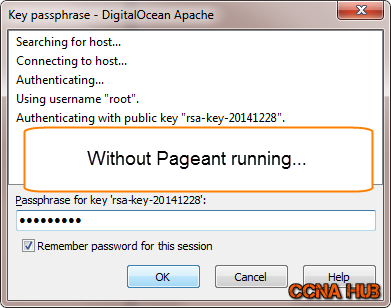
4. Enter Passphrase
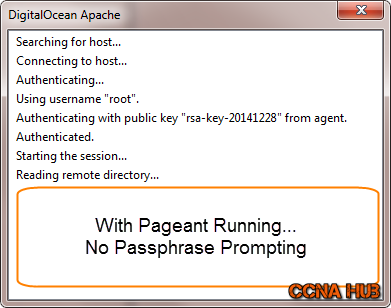
If PageAnt is running, then you won’t be prompted to enter a Passphrase.
5. Open Putty from WinSCP
 You will be prompted to enter a root Password or Private Key’s Passphrase, but if you have configured PageAnt, you should not be asked by Putty to Enter neither User name nor Passphrase.
Connect Using Bitvise and SSH-Keys
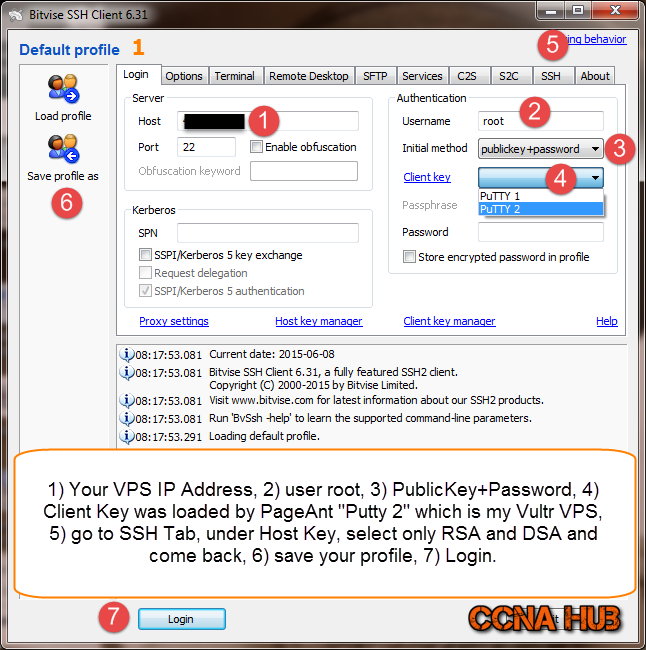
I believe Bitvise is an advanced version of Putty, if you are familiar using Putty and WinSCP, then Bitvise will be easy to grasp. Same thing, if you want to avoid entering the Passphrase using Bitvise, make sure PageAnt configured and running as described above.
Run the following steps ( 1 to 5)
1. Fire Up Bitvise
If you haven’t downloaded and Installed Bitvise SSH Client yet, Please do and come back.
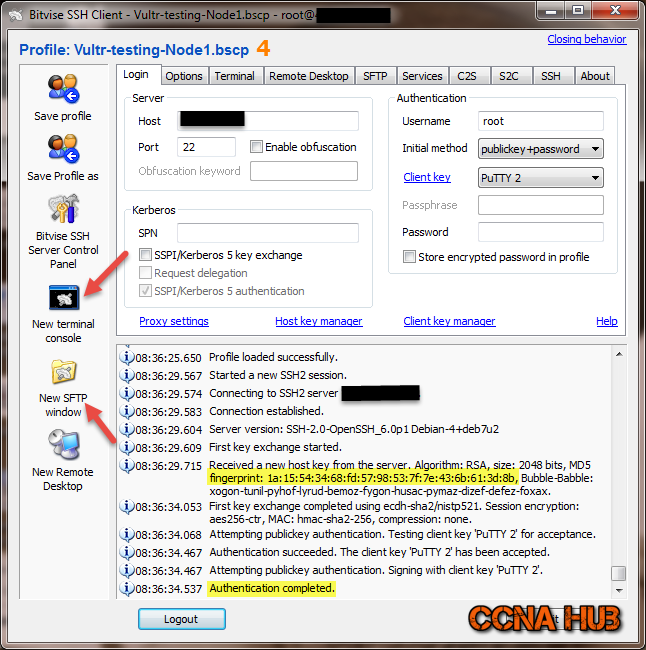
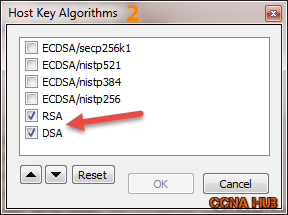 2. Verify Host Server’s Key Fingerprint
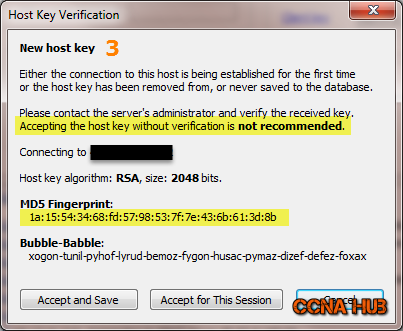
If you read Part1 of this article, I have went through how to retrieve your VPS server’s key fingerprint before clicking Accept and Save. In my case, the first and last 2 digits 1a and 8b matched my Vultr VPS key fingerprint.
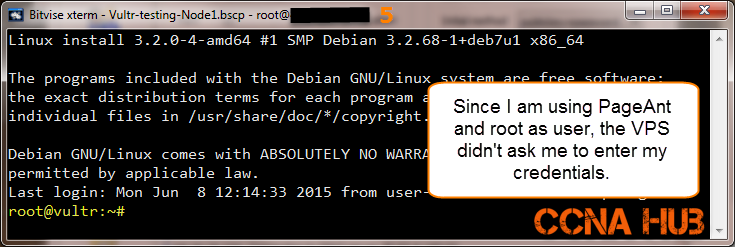
 3. After You are Successfully Logged in
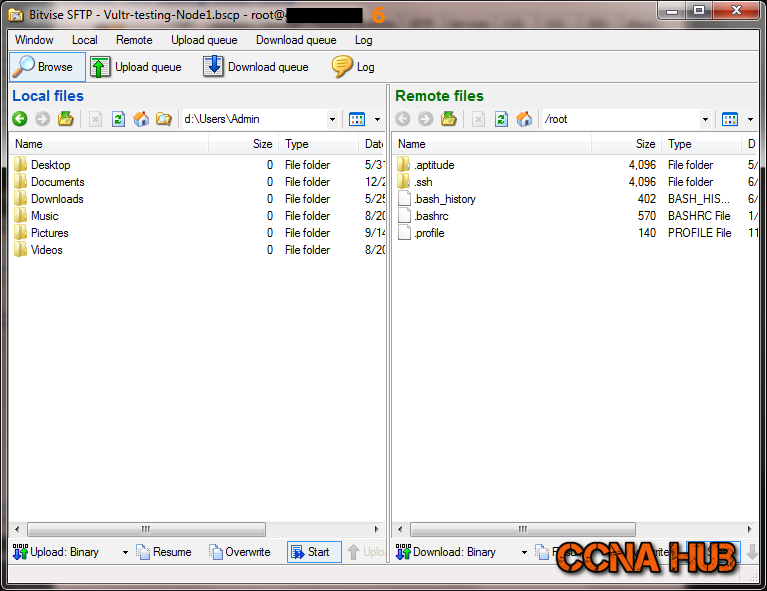
From there, you can open Terminal or SFTP session manager.
5. Bitvise SFTP Window
Connect Using Linux/UNIX SSH Client
ssh-agent can be used at your Linux/UNIX Admin Station (where you have created the SSH-Keys Pair) to avoid entering Passphrase every time you connect to your VPS.
At your Linux/UNIX Admin station, fire up ssh-agent, then it will decrypt your Private Key using the Passphrase and store it inside the Memory, ready to be used when you connect to your VPS.
Run the following steps ( 1 to 4)
1. Run ssh-agent at Admin Station
eval $(ssh-agent)
You will see something similar to the following…
Agent pid 1448299
2. Now, Add Your Private Key to the Agent
ssh-add
You will be prompted to enter the Private Key’s Passphrase:
Enter passphrase for /root/.ssh/id_rsa:
Identity added: /root/.ssh/id_rsa (/root/.ssh/id_rsa)
3. Now Connect to your VPS
ssh root@YOUR-VPS-IP-ADDRESS
Notice, you won’t be prompted to enter the Passphrase if ssh-agent is being used:
[root@admin-station ~]# ssh root@YOUR-VPS-IP-ADDRESS
Linux node.wordpresshostinghub.com 3.2.0-4-686-pae #1 SMP Debian 3.2.65-1+deb7u1 i686

The programs included with the Debian GNU/Linux system are free software;
the exact distribution terms for each program are described in the
individual files in /usr/share/doc/*/copyright.

Debian GNU/Linux comes with ABSOLUTELY NO WARRANTY, to the extent
permitted by applicable law.
Last login: Tue May 19 02:26:14 2015 from user-0cdfxxx.cable.mindspring.com
root@node:~#
TIP: by default the name of the created private key id_rsa if you haven’t set a name during SSH-Keys creation, however, if you have created multiple private keys using different names, then use -i switch to specify the key path and name. For Example:
ssh -i /root/.ssh/YOUR-PRIVATE-KEY root@YOUR-VPS-IP-ADDRESS
4. List or Delete Private Keys from SSH-Agent
-l to list fingerprints of all identities (Means Private keys)
Note: Using -D Switch, you will loose credentials of all Added Private Keys, and you need to add them again with their Passphrases in order to use them.
ssh-add -l
ssh-add -D
SSH-Keys Best Security Practices
PageAnt and ssh-agent meant to make life mush easier, especially if we deal with a lot of machines during the day, but this convenience comes with serious risks if we don’t follow Agents Best Security Practices.
a. Keep Your Admin Station Up2date
PageAnt and ssh-agent won’t guarantee private key security when decrypted inside the your Admin Station memory, especially on windows stations. Any Trojan horse can read your computer’s memory while you are logged in and can copy the decrypted key with it’s passphrase back to it’s master.
If you don’t trust the SysAdmin or the Owner of specific station, then don’t create SSH-Keys at this station. Keep your Admin Station always up2date with the latest OS, Anti-Virus, and Anti-Spyware updates.
b. Suspension and Hibernation
If you suspend your Admin Station or used hibernation, your decrypted private key will remain in the Memory. Therefore, always shuts down your Admin Station when you done to flush the memory.
c. Create SSH-Key Per Admin Station
Not recommended to copy your Private key to different station, if your company provided you with a Laptop, then create NEW SSH-Keys at their laptop. You can upload your personal station Public Key and your company’s laptop Public Key to the same VPS in order authenticate when you SSH, therefore, Private keys must not leave the machine where it was created. The shareable part is only the Public Key.
Everyone of us got his own personal Admin Station, create new set of SSH-Keys at this laptop if it’s secure, and share or upload the Public Key to your VPS. Meaning, if your station get lost, decommissioned, or stolen, then it will be very easy to remove the Public Key from all the VPS instances that is associated with that machine’s private key. So, adding comment while you are creating the SSH-Keys pair is very crucial step.
d. Use Separate SSH-Keys and Passphrases
As mentioned, I recommend to use separate SSH-Keys and separate Passphrases for each project, client, or site. Use Passphrases from structured sentences that got Capital Letters, Numbers, and maybe special characters such “!” which will be easy to remember.
Passphrase can be easy to remember and very strong to break, pick Few Words and Numbers as sentence to remember it. E.g. “I was born in Europe 1985, but I was raised in NY, USA since 90’s.” your Passphrase would be as follows Iwbie1biwrinus9 – it starts with capital ” I “. It would take a desktop PC approximately 8,707,845,285 years and 28 days to Brute Force and Crack this Passphrase!
Notice how I picked the first alphabet of each word, the first numeric of each number, and built my passphrase based on that. Besides, you can add “!” somewhere into the Passphrase, decide where you want to add this special character and stick with that location.
Subject Related
By Wikipedia WinSCP | WinSCP | Ask Leo | wipo.int
Building Professional Web Hosting Solution
<< Linux Basic Setup and Configuration Course
>> Configuring SSH-Key Based Authentication Section
- Understanding SSH-Keys Based Authentication
- Creating SSH-Keys using Putty Keys Generator
- Creating Public VPS Droplet using DigitalOcean
- Managing Linux VPS Instance via Putty SSH Client
- Managing Linux VPS Instance via WinSCP Client
- Creating SSH-Keys using Terminal Keys Generator
- Switching SSH Password to SSH-Keys Authentication
- Uploading Admins and Friends SSH-Keys to VPS
- Uploading SSH Public Keys using VPS Panel
- SSH Hopping using SSH Agent Forwarding
- Deploying Public VPS instance using Vultr Provider
- Securing and Hardening SSH Server Configuration
- SSH Server and Client Most Known Error Messages

LEAVE A COMMENT