Building Professional Web Hosting Solution
<< Linux Basic Setup and Configuration Course
>> Configuring SSH-Key Based Authentication Section
- Understanding SSH-Keys Based Authentication
- Creating SSH-Keys using Putty Keys Generator
- Creating Public VPS Droplet using DigitalOcean
- Managing Linux VPS Instance via Putty SSH Client
- Managing Linux VPS Instance via WinSCP Client
- Creating SSH-Keys using Terminal Keys Generator
- Switching SSH Password to SSH-Keys Authentication
- Uploading Admins and Friends SSH-Keys to VPS
- Uploading SSH Public Keys using VPS Panel
- SSH Hopping using SSH Agent Forwarding
- Deploying Public VPS instance using Vultr Provider
- Securing and Hardening SSH Server Configuration
- SSH Server and Client Most Known Error Messages

Uploading SSH Public Keys using VPS Panel would be the next logical step after creating your SSH-keys. As mentioned, the Public key is simply what it sounds, the Public Part of your SSH-keys Chain. Using a Public Key, you can be certain that Only and Only the other pair of the SSH-keys pair (which is the Private) is able to unlock access to the VPS for Management. Meaning, no matter how Publicly the Public Key is exposed, it’s useless without its pair – Private Key.
It’s worth to mention also, that in encryption world, people can use your Private Key to encrypt something for you, and you at the other side of the world, only and only you will be able to decrypt the message since you own the second part of the Keys pair.
Objectives:
Adding Public Keys to VPS Service Providers
Prerequisites:
A. Basic Debian or Red Hat Linux Knowledge
B. Login to your DigitalOcean or Vultr Account
Recommendations:
For better performance, use VPS with at least 2 CPUs, 4G Memory, 1G Bandwidth, and SSD Storage drive.
Adding Public Keys to DigitalOcean or Vultr
Adding Public Keys to provider’s control panel is highly recommended before creating VPS instances, which will allow you to create VPS instances using SSH-keys option. If you are interested to set SSH-Keys for already running VPS, check Switch From Password to SSH-Keys Authentication Article.
DigitalOcean Platform
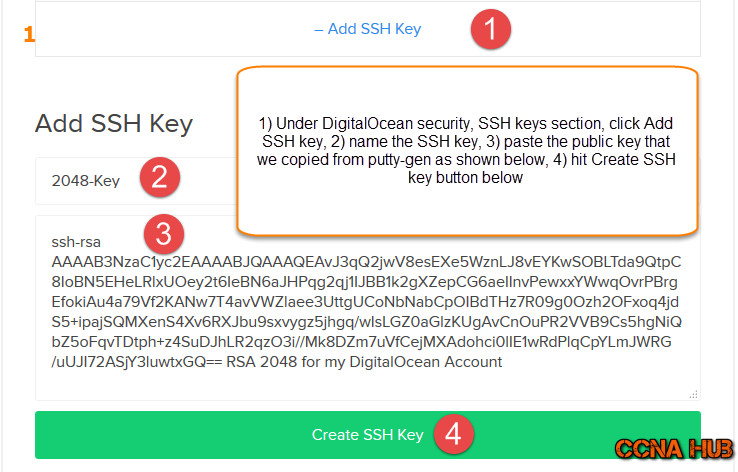
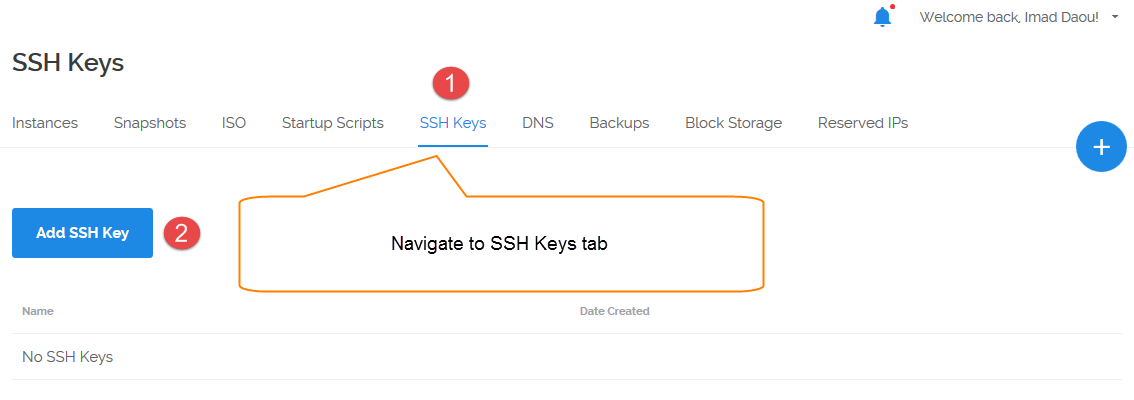
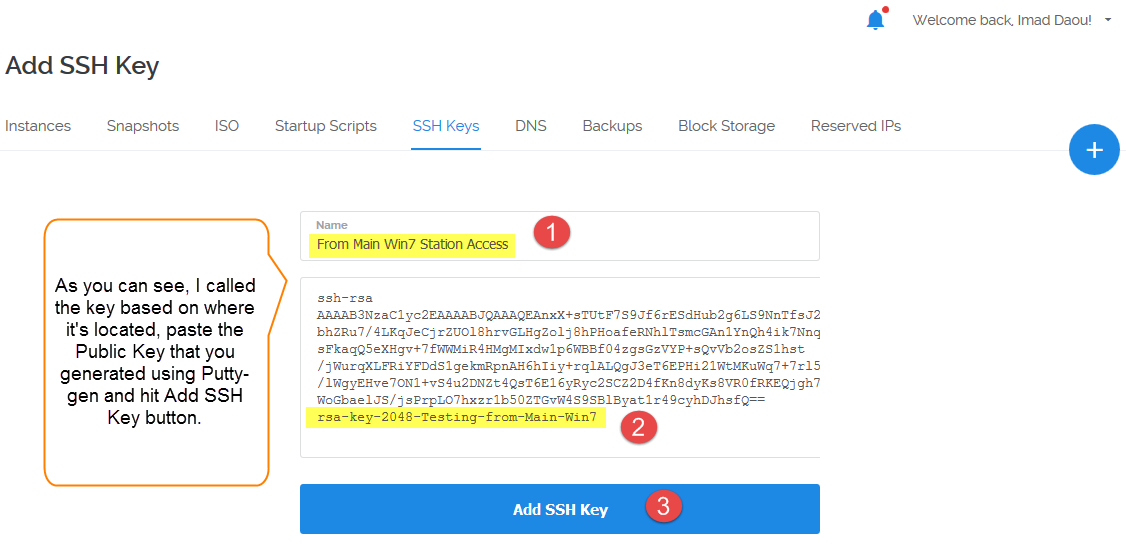
Login to DigitalOcean Control Panel and follow the steps as shown below.
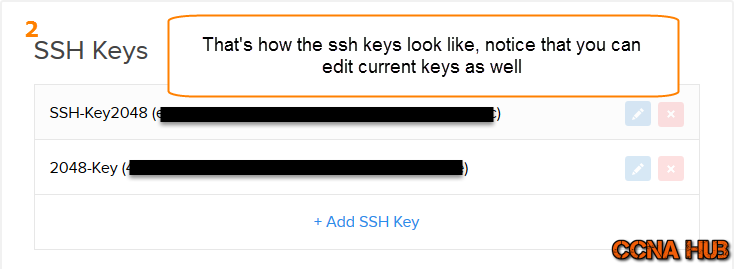
Run the following steps ( 1 to 2)
1. Navigate to Add SSH-Keys Under Security
2. You should see all Added SSH-Keys
Vultr Platform
Login to Vultr Control Panel and follow the steps as shown below.
Run the following steps ( 1 to 2)
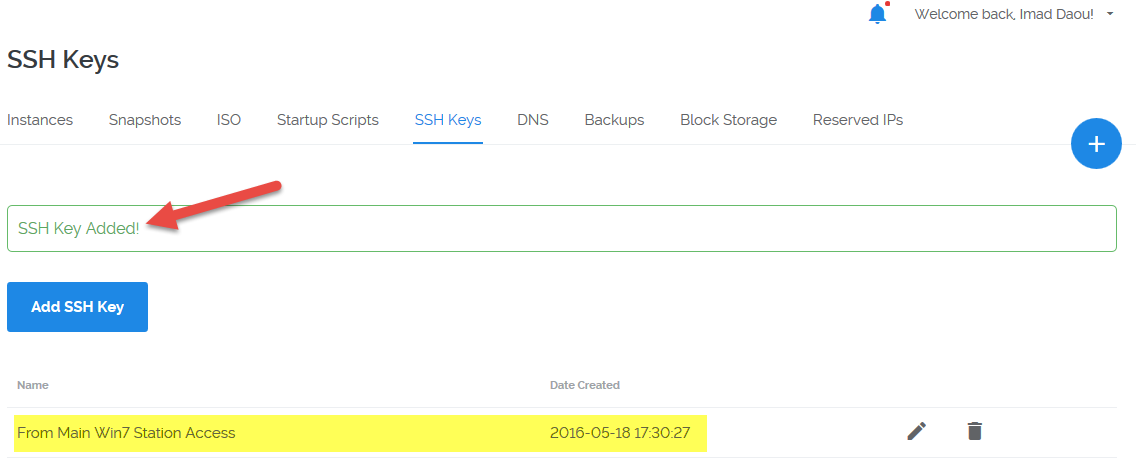
1. Navigate to Add SSH-Keys Under Server Deploy
2. You should see all Added SSH-Keys
Summary
SSH-Keys considered the first line of defense against Bruteforce, however, to complete that defense line, you should remember to disable SSH Password Authentication when you reach to Securing and Hardening SSH Server Configuration Lab. Besides, under Best Security Measures course, I will show you how to setup Multiple lines of defense such IPtables Firewall, Intrusion Detection/Prevention, and Blacklist to protect your VPS.
Subject Related
By Wikipedia SSH | About SSH | Linode HowTo | DigitalOcean HowTo | Vultr HowTo
Building Professional Web Hosting Solution
<< Linux Basic Setup and Configuration Course
>> Configuring SSH-Key Based Authentication Section
- Understanding SSH-Keys Based Authentication
- Creating SSH-Keys using Putty Keys Generator
- Creating Public VPS Droplet using DigitalOcean
- Managing Linux VPS Instance via Putty SSH Client
- Managing Linux VPS Instance via WinSCP Client
- Creating SSH-Keys using Terminal Keys Generator
- Switching SSH Password to SSH-Keys Authentication
- Uploading Admins and Friends SSH-Keys to VPS
- Uploading SSH Public Keys using VPS Panel
- SSH Hopping using SSH Agent Forwarding
- Deploying Public VPS instance using Vultr Provider
- Securing and Hardening SSH Server Configuration
- SSH Server and Client Most Known Error Messages

LEAVE A COMMENT